Are you aware that securing a WordPress web site is now extra necessary than ever as a result of the expanding frequency and complexity of cyber-attacks? It’s a harsh truth that no on-line industry can come up with the money for to forget about.
Actually, consistent with Colorlib experiences, greater than 13,000 WordPress web pages have been being hacked every day in 2023.
That’s a staggering quantity, and it implies that you wish to have to be additional vigilant in the case of securing your on-line presence.
However there’s no want to panic.
On this put up, we’ll speak about the stairs you’ll take to stay your web page protected and secure from cyber threats so you’ll focal point on rising your corporation with none worries.
So, when you’re in a position to take your web page safety to the following stage, let’s dive proper in!
1 Why Safe a WordPress Site?
Your web page serves as your on-line house, and WordPress is the platform in the back of it. Then again, like a bodily house, your WordPress web site wishes sturdy partitions to face towards doable threats.
Right here’s why it’s very important to protected your web page:
Securing Your Site and Guests’ Privateness
In line with information, a median of 69% of hacked WordPress websites fall sufferer to old-fashioned tool and susceptible passwords. That is like leaving your entrance door open with a welcome mat for cyber thieves.
Cybercrime losses for companies hit trillions yearly, and WordPress is a common goal.
Due to this fact, safeguarding delicate information like passwords, emails, and monetary main points is significant. A protected web page fosters person accept as true with and engagement, and customers are much more likely to go back to a protected web site, boosting customer loyalty and conversions.
Combating Knowledge Breaches and Malware Injections
Knowledge breaches could cause reputational injury, felony problems, and misplaced buyer accept as true with, costing companies a median of $9.44 million to get better from in the United States.
Additionally, malware injections on hacked WordPress web pages can redirect guests to malicious websites, harmful your search engine optimization score and person revel in. So, it is important to stay your web page protected to forestall such eventualities.
Spice up Your Site’s search engine optimization Efficiency
Google prioritizes safety, and protected web pages ceaselessly experience higher search engine optimization ratings. Securing your WordPress web site can enhance seek engine ratings, attracting extra natural site visitors.
Additionally, malicious scripts and plugins can bathroom down your web page, dragging down web page loading instances and irritating customers. A protected web page runs easily, protecting your guests satisfied and engaged.
Compliance with Knowledge Privateness Laws
Knowledge privateness rules require sturdy web page security features to give protection to person information. GDPR and CCPA are one of the rules that companies want to conform to.
Due to this fact, securing your WordPress web site is very important to keep away from hefty fines and felony headaches.
Be mindful, web page safety isn’t a one-time funding however an ongoing procedure.
Via taking proactive measures, you’ll turn out to be your WordPress web site from a susceptible goal to a protected castle, safeguarding your information, recognition, and on-line luck.
2 How one can Safe a WordPress Web page
Allow us to now speak about quite a lot of tips on how to protected a WordPress web site.
2.1 Fundamental Very important Safety Measures
Allow us to now speak about the necessary safety practices to give protection to your WordPress web page from doable dangers.
Stay The whole thing Up to date
Protective your WordPress web site is easy—stay it up-to-the-minute. This comprises WordPress and its core information, equivalent to issues and plugins.
Common updates are the most important as they ceaselessly come with safety patches for vulnerabilities came upon in earlier variations.
Past safety, updates additionally introduce new options and improvements in your web page.
To check and replace your WordPress web site and its core information, log in in your dashboard and move to Dashboard → Updates.
If an replace is to be had, click on the Replace to model button. For issues and plugins, head to the Topics or Plugins segment, make a selection the ones desiring an replace, and click on the replace button subsequent to every.

For additonal safety, believe enabling computerized updates for WordPress, plugins, and issues. This guarantees your web site remains protected, even whilst you’re now not actively tracking it.
Ahead of enabling computerized updates, be sure you again up your web page incessantly. This precaution guarantees you’ll simply repair your web site if anything else is going mistaken all through or after an replace.
Use Robust and Distinctive Passwords
You’ll be able to additionally protected your WordPress web page via the use of sturdy and distinctive passwords. Vulnerable and simply guessable passwords make it more practical for hackers to realize unauthorized get entry to in your web site.
To create sturdy and protected passwords, practice the following tips:
- Choose for no less than 12 characters or extra.
- Combine uppercase and lowercase letters, numbers, and particular characters.
- Steer clear of the use of sequential numbers, repeated characters, or commonplace passwords like “password123”.
- Use a unique password for every on-line account, together with your WordPress web site.
- Believe using a competent password supervisor instrument to generate and securely retailer your passwords.
- If imaginable, keep away from passwords that come with your username or web page title.
Be mindful, when putting in a brand new WordPress web site, at all times substitute the default password pattern with a more potent one.
But when your WordPress web page is already arrange, exchange your password via navigating to Customers → Profile, scrolling down, and clicking the Set New Password button for a robust, random password.

Additionally, incessantly exchange your password with sturdy passwords every time.
Set up an SSL Certificates
When securing your WordPress web site, putting in an SSL certificates is necessary. This certificates guarantees that the knowledge exchanged between your web page and guests is encrypted, offering coverage towards unauthorized get entry to.
Acquiring an SSL certificates can also be finished via both buying one from respected suppliers or getting a unfastened certificates via your webhosting supplier.
Then again, you probably have already put in an SSL certificates in your WordPress web page however it isn’t showing for your web page URL, there’s a option to allow it.
Merely move to Settings → Normal to your WordPress dashboard and alter the “WordPress Deal with (URL)” and “Web page Deal with (URL)” via including ‘https://’ firstly as an alternative of ‘http://’.
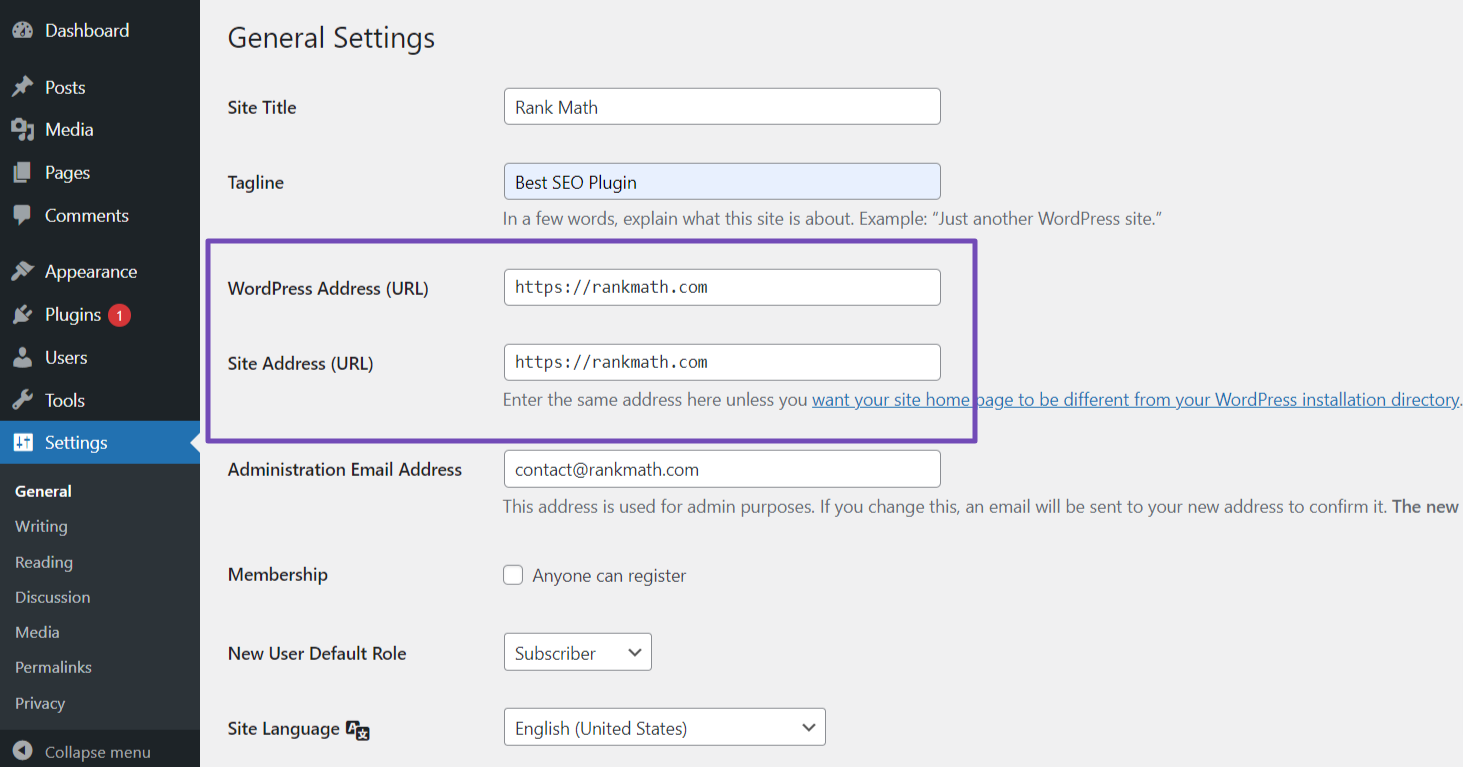
However when you stumble upon SSL-related problems for your web page, you’ll use plugins equivalent to Truly Easy SSL or SSL Insecure Content material Fixer to unravel them.
Make a selection Safe Website hosting
To fortify safety, make a selection a credible webhosting supplier recognized for its security features and reliability. Search for options like firewalls, malware scanning, and DDoS coverage.
Make certain they provide common backups, fortify protected protocols like SFTP or SSH, and stay their infrastructure and tool up to date. A protected webhosting supplier bureaucracy a robust basis in your WordPress web site’s safety.
To enforce this, analysis webhosting suppliers, learn critiques, and make a choice one with a excellent safety recognition.
Test their options, fortify, and backup choices. Whilst you prioritize a protected webhosting surroundings, it’ll assist safeguard your web page and information.
2.2 Safe Your WordPress Site
Allow us to now speak about one of the best tactics to protected your WordPress web page, together with easy methods to save you unauthorized get entry to, offer protection to your information, and scale back the chance of cyber assaults.
Use Safe Topics and Plugins
When deciding on issues and plugins in your WordPress web site, it’s necessary to select them from respected resources just like the legit WordPress repository or MyThemeShop.
Those resources habits thorough safety assessments and persistently supply updates to make sure the protection in their merchandise.
Then again, it’s necessary to keep away from the use of issues or plugins from unknown or unreliable resources, particularly nulled issues or plugins. Those would possibly harbor vulnerabilities or malicious code that may jeopardize your web site’s safety.
Ahead of putting in a theme or plugin, make an effort to check the scores, learn person comments, and assess the replace frequency to make sure it’s faithful and actively maintained.
This guarantees that your web page stays protected and up-to-the-minute with the newest security features.
Continuously Backup Your WordPress Site
Continuously backing up your web page’s information is very important for shielding it towards safety incidents, information loss, and web page problems. With contemporary backups, you’ll repair your web site briefly in case of cyberattacks and decrease downtime.
Developing backups day-to-day is in most cases beneficial, particularly for web pages with a large number of content material and excessive site visitors.
Moreover, it’s necessary to check your backups periodically to make sure their reliability. One option to simplify the backup procedure is via the use of plugins providing options like scheduled backups and far off garage choices.
You’ll be able to consult with our detailed put up on backing up your WordPress web page.
Restrict Login Makes an attempt
Differently to protected your web page is to restrict login makes an attempt for your web page, which restricts the selection of failed login makes an attempt from a unmarried IP deal with.
This makes it tougher for hackers to realize unauthorized get entry to via guessing your login credentials.
Whilst you restrict login makes an attempt, you’ll upload a layer of coverage towards brute-force assaults for your WordPress web page.
Right here’s how you’ll restrict your web site login makes an attempt:
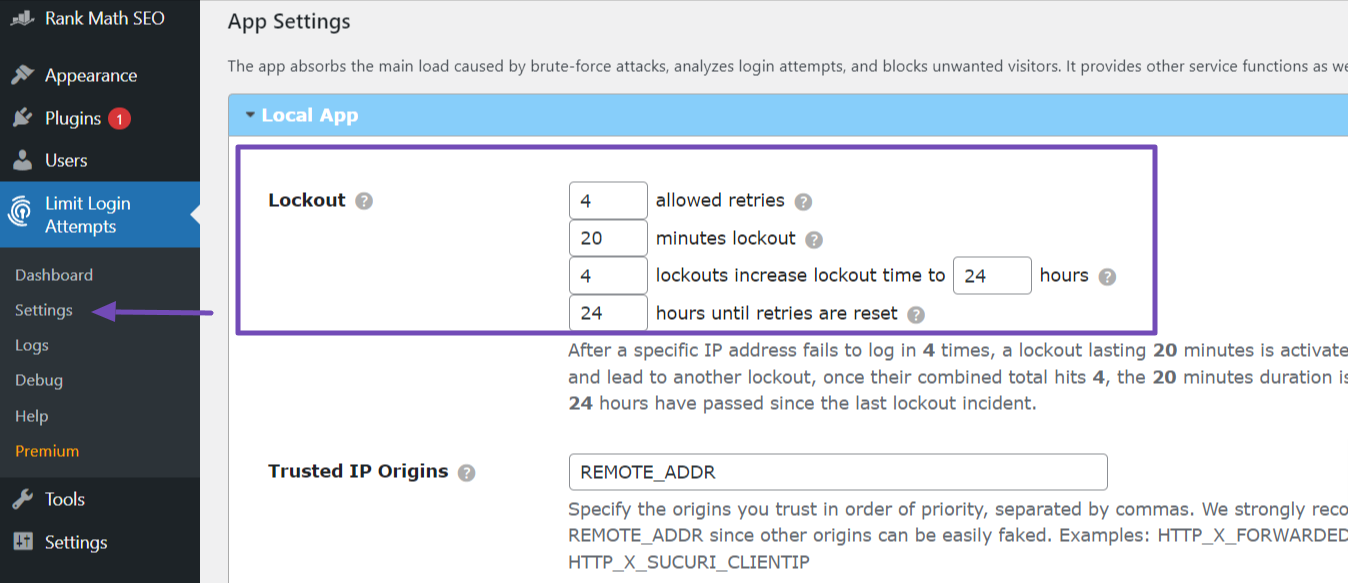
- Set the length of the lockout length for blocked IP addresses.
- Optionally, allow e-mail notifications to obtain signals about lockouts or suspicious login makes an attempt. You’ll be able to see this feature within the Normal Settings.
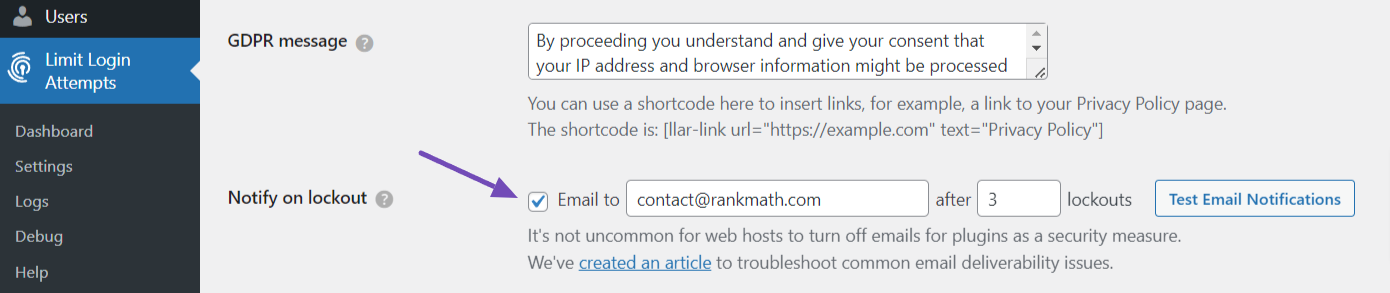
After right kind setup, your web site login makes an attempt will probably be restricted, and any IP deal with that exceeds your specified selection of failed login makes an attempt will probably be quickly blocked from getting access to the login web page.
Permit 2FA (Two-Issue Authentication)
Enabling Two-Issue Authentication (2FA) provides an extra layer of safety in your WordPress web site via requiring customers to offer two varieties of verification to log in.
Very similar to Google, Fb, and Twitter, you’ll support your WordPress web page with this selection, considerably decreasing the chance of unauthorized get entry to, even supposing your password is compromised.
Right here’s how:
- Set up and turn on the “Wordfence Login Safety” plugin. As soon as activated, move to the ‘Login Safety’ menu.
- Discover a QR code and key within the ‘Two-Issue Authentication’ tab. So, it is important to scan it to turn on the authenticator for your web page.
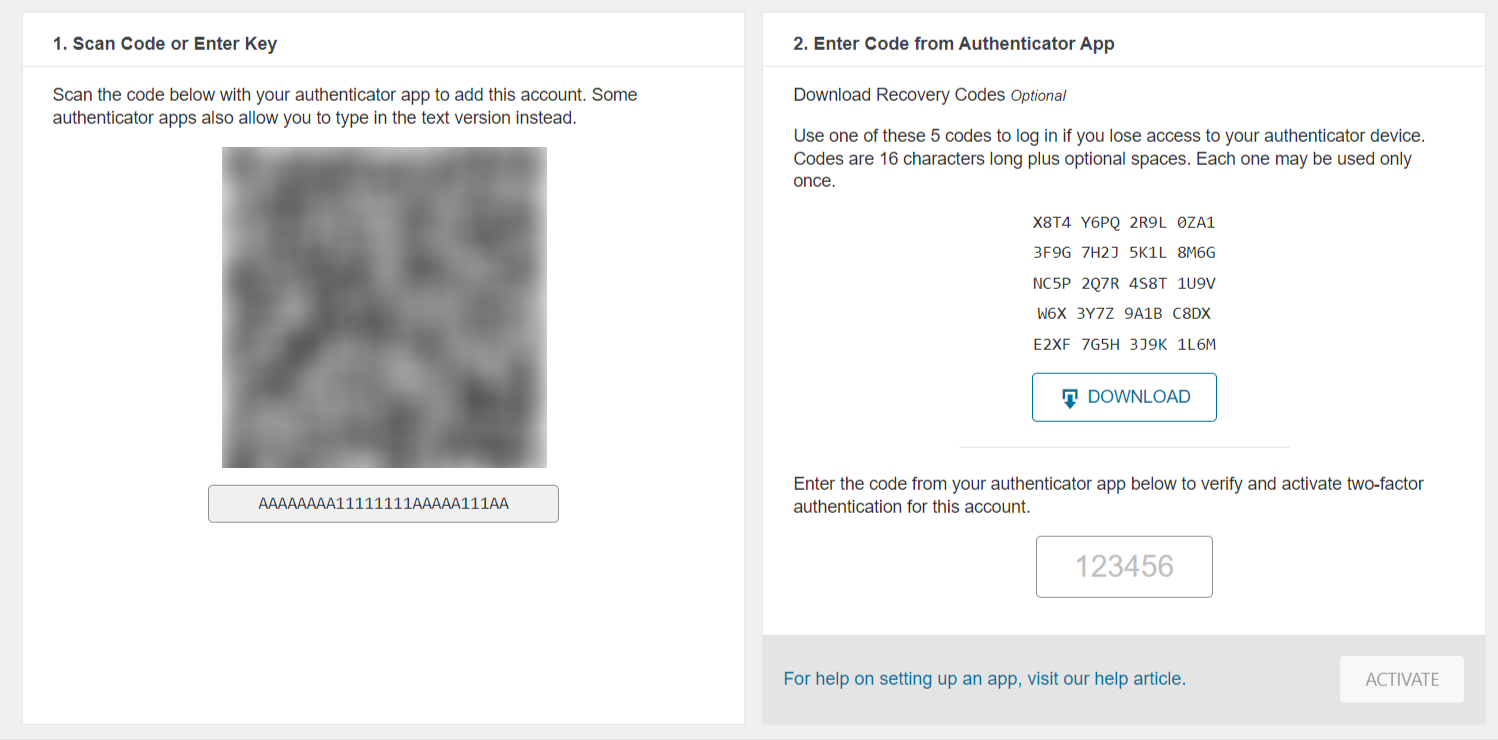
- Subsequent, obtain and set up the Google Authenticator app for your telephone; you’ll use it to scan the QR code for activation for your web page.
- Open the app and make a selection ‘Scan a QR code’ to scan the code, or input the setup key manually.
- After the app verifies the code, it supplies a novel code. Reproduction this code to the designated box beneath the restoration codes segment.
- Click on at the ACTIVATE button to finish the setup.
Don’t omit to obtain the 5 restoration codes the use of the DOWNLOAD button. Those codes are the most important should you lose your telephone, making sure persisted get entry to in your web page.
Use Powerful Anti-Junk mail Answers
Junk mail can also be bothersome and produce about safety dangers, compromise person revel in, and negatively affect your web site’s efficiency.
So, to forestall unsolicited mail successfully for your web page, you’ll make the most of the “Akismet Anti-spam” WordPress plugin.
Akismet is a formidable spam-filtering plugin evolved via Automattic, the corporate in the back of WordPress. It normally comes pre-installed with WordPress, and also you simply want to turn on it and acquire an API key.
To acquire the API key, you’ll want to sign in at the Akismet web page after which input it into the API Key box at the plugin web page to your WordPress dashboard.
Whenever you’ve effectively hooked up the API Key, the Akismet plugin will make use of complicated algorithms to research feedback and shape submissions for your web page robotically, successfully filtering out unsolicited mail.
Then again, you’ll go for the “Antispam Bee” plugin, which serves a an identical objective.
Exchange Default Admin Username
All through the set up of a WordPress web page, the default username is usually set as ‘admin.’ Then again, there are cases the place customers mistakenly go away this username unchanged.
Hackers ceaselessly goal the “admin” username as it’s well known, which facilitates their malicious endeavors. To fortify your web site’s safety, you will need to exchange the admin username, making it tougher for attackers to bet and achieve unauthorized get entry to.
Sadly, WordPress does now not be offering an immediate technique to alter usernames as soon as the set up is entire.

So that you could bypass this, you must set up and allow the “Exchange Username” plugin. As soon as activated, move to Customers → All Customers, make a selection the person with the username “admin,” and click on “Edit.”
At the Profile web page, find the ‘Username’ possibility, and click on Exchange. Then, make a selection a brand new username for the admin account, ideally one thing distinctive and unrelated in your web site’s title.
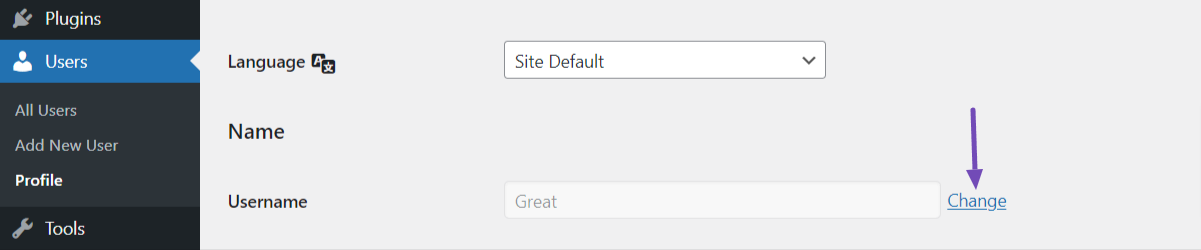
Finally, scroll to the ground of the web page, and click on the Replace Profile button to avoid wasting the adjustments. WordPress will robotically replace the admin username.
Converting the admin username received’t affect your web page’s content material or settings. The one exchange will probably be to the username for getting access to the admin dashboard.
Exchange the Default “wp-login” URL
We all know that the default login URL of a WordPress-powered web page usually ends with “wp-login.”
Then again, it is important to exchange this URL development to make it tougher for other people to get entry to your login URL, let on my own try to use your login main points.
To modify the default “wp-login” URL, practice those steps:
- Set up and turn on the “WPS Conceal Login” plugin from the WordPress Plugin Listing.
- After activation, navigate to Settings → WPS Conceal Login, and it’ll take you to the ground of your WordPress web site’s basic settings.
- Subsequent, upload a customized login URL this is distinctive and now not simply guessable.
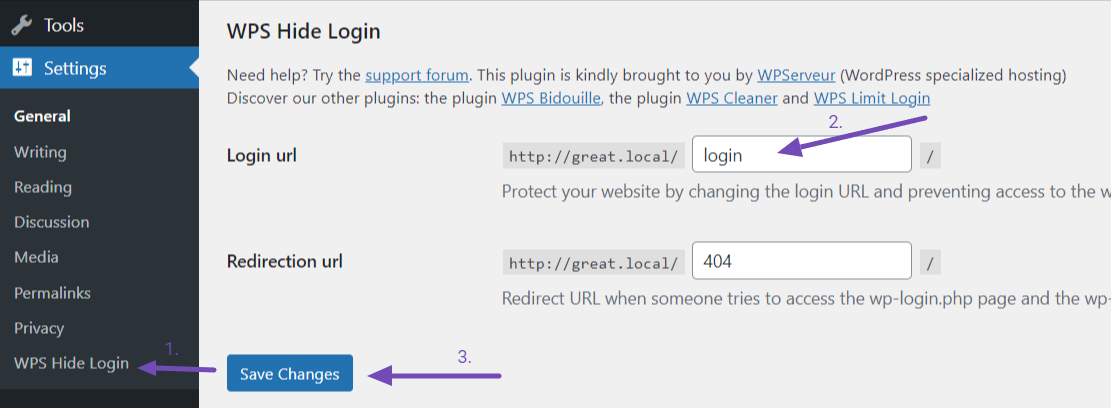
- Then, save the adjustments, and the plugin will robotically replace the login URL.
As soon as the customized login URL is about, it is important to get entry to the brand new URL to log in to the WordPress admin dashboard. The default “wp-login” URL will now not be out there.
Opting for a customized login URL is beneficial to be simple for you to keep in mind however tricky for others to bet.
Continuously Scan Your Site
To stay your WordPress web site protected, it’s very important to incessantly scan for doable safety threats, malware, or suspicious actions. This proactive measure is helping handle the integrity of your web page.
Set up and turn on a safety plugin like Sucuri Safety from the WordPress Plugin Listing to accomplish common scans.
After activation, navigate to Sucuri Safety → Dashboard, the place you’ll begin scans. The plugin plays day-to-day scans via default, however you’ll customise the frequency within the settings.
After every scan, evaluate the effects supplied via the plugin and take vital movements according to the findings. This regimen tracking guarantees the continued safety of your WordPress web site.
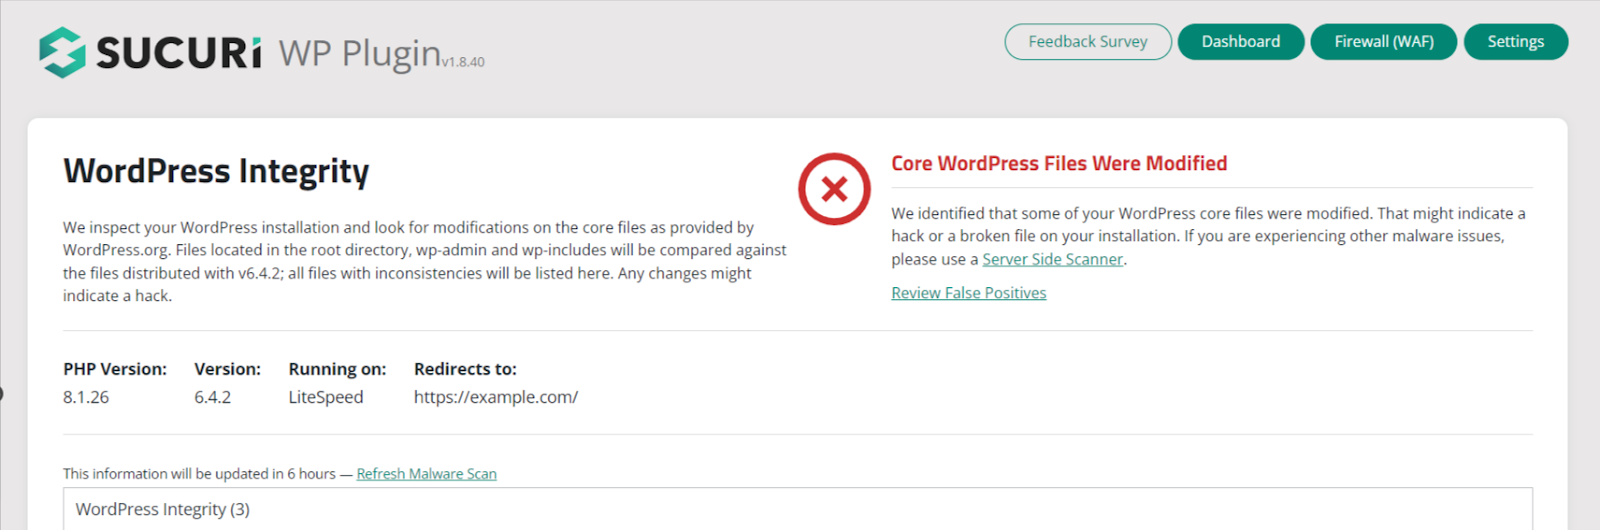
Some scan effects would possibly contain casting off malware, updating plugins or issues, or addressing known vulnerabilities.
At all times Test Web page and Consumer Actions
Tracking web site and person actions is the most important for making sure the protection of your WordPress web page.
Via keeping an eye on movements taken for your web site, you’ll promptly locate any suspicious or unauthorized actions and take vital movements to deal with them successfully.
To watch web site actions, you’ll make the most of the Audit Logs characteristic of the Sucuri plugin. Get right of entry to the Sucuri dashboard and scroll down till you find the Audit Logs tab.
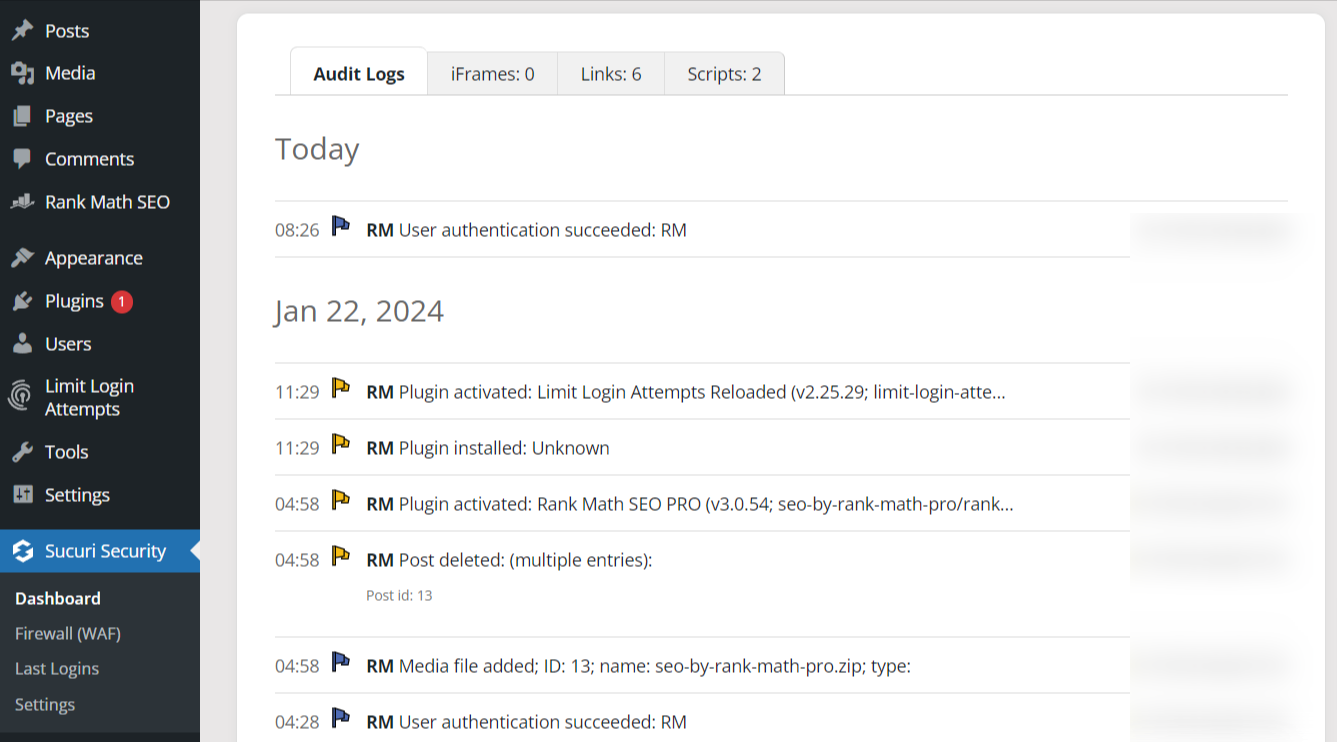
Those logs will display you main points equivalent to login makes an attempt, record adjustments, plugin installations, and extra.
Additionally, you’ll navigate to the Ultimate Logins segment to test and monitor your web page login actions, together with a hit and unsuccessful makes an attempt.

For those who locate any suspicious actions, take instructed motion to analyze and mitigate doable safety dangers.
An alternative choice is to make use of a standalone plugin known as ‘Easy Historical past’ to observe your web page task logs. This instrument supplies treasured insights into person movements and is helping handle a protected WordPress surroundings.
Set Up a Machine for Safety Indicators
Putting in place a gadget for safety signals guarantees you obtain well timed notifications about doable safety problems or adjustments for your WordPress web page.
Via promptly receiving signals, you’ll instantly deal with any threats or vulnerabilities.
You’ll be able to use the Indicators characteristic within the Sucuri plugin to obtain your web page task signals. Navigate to the Settings segment and make a selection the Indicators tab.
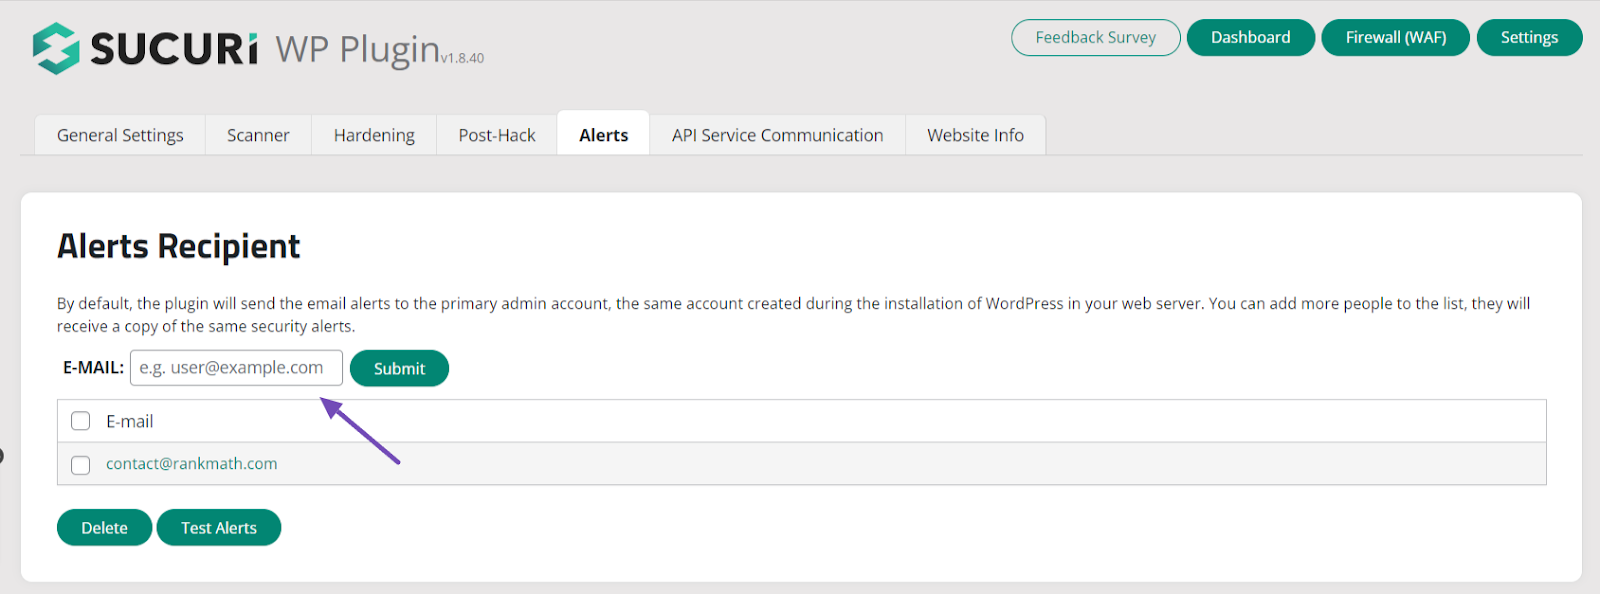
Within the Indicators tab, upload the e-mail for receiving signals, set the frequency, and specify the kind of safety alert.
Test that the supplied touch main points for alert notifications are correct and up-to-date. This selection could also be frequently present in different safety plugins.
2.3 Complicated Safety Measures
Allow us to now discover some complicated security features that you’ll take to fortify the protection of your WordPress web page.
Set Up Geo-Blockading to Block IPs
Enforcing GEO-blocking for your WordPress web page means that you can prohibit get entry to from explicit nations or areas via blockading IP addresses related to the ones places.
This may assist fortify the protection of your web site via combating get entry to from doable malicious actors or high-risk areas.
You’ll be able to block IPs via your WordPress dashboard, cPanel, WordPress plugin, .htaccess, and config.php record.
GEO-blocking can successfully block get entry to from explicit areas, but it surely may not be foolproof.
Some IP addresses could also be dynamically assigned or simply spoofed, so we suggest the use of GEO-blocking with different security features.
Permit Internet Software Firewall Coverage
A Internet Software Firewall (WAF) acts as a protecting barrier between your web site and doable threats via filtering out malicious site visitors and blockading recognized assault patterns.
You’ll be able to allow the WAF coverage possibility free of charge the use of the Wordfence Safety plugin. So it is important to set up and turn on the plugin for your wordpress web page.
After activation, navigate to Wordfence → Firewall and allow the Wordfence Firewall. Then, arrange the firewall settings consistent with your personal tastes, equivalent to enabling the WAF regulations and complicated firewall choices.
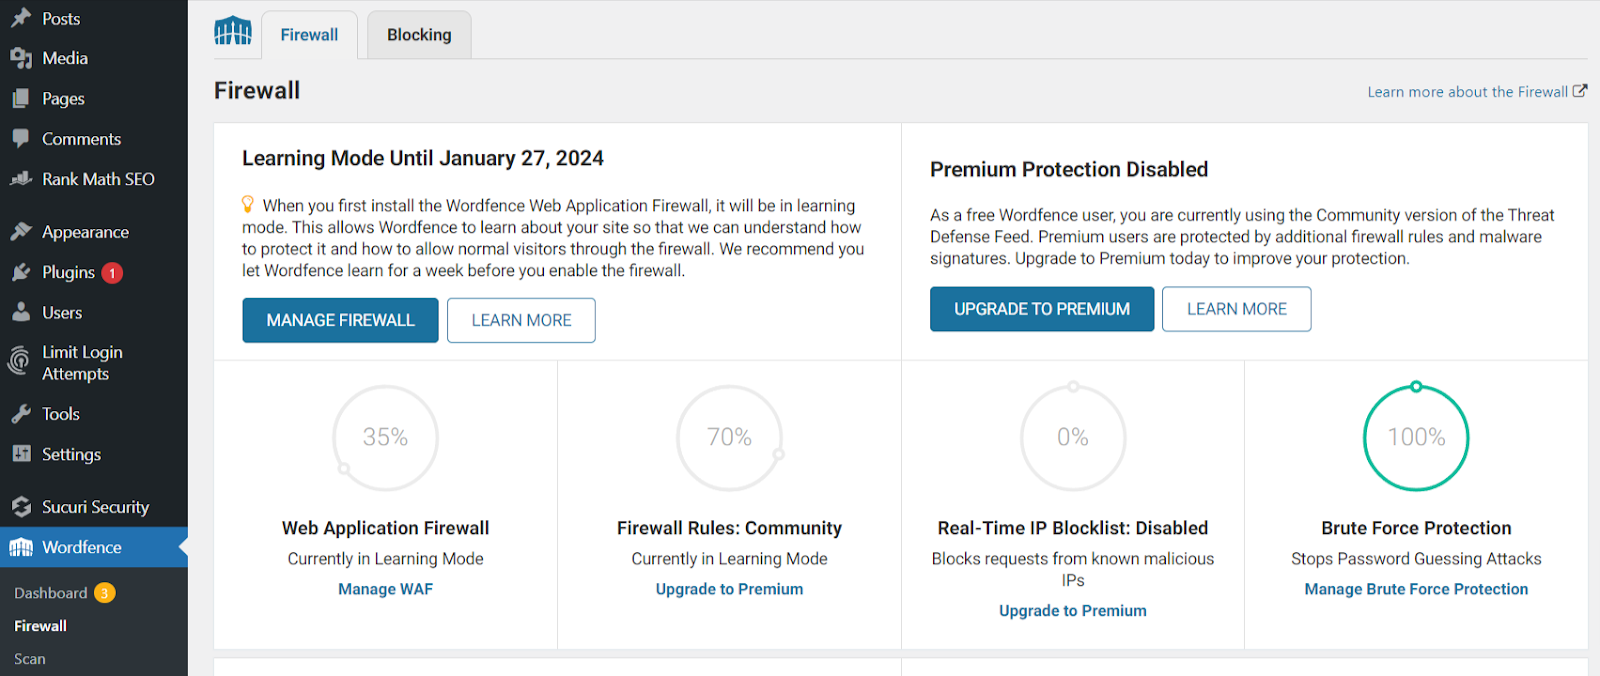
After that, save the settings, and the Wordfence plugin will get started offering WAF coverage in your web page.
Via enabling the Wordfence WAF, your web page will probably be secure towards commonplace safety threats, equivalent to SQL injections, cross-site scripting (XSS) assaults, and brute-force login makes an attempt.
The WAF steadily screens and filters incoming site visitors to dam malicious requests prior to they achieve your web page.
Disable Trackbacks and Pingbacks
Trackbacks and pingbacks are strategies WordPress makes use of to inform different websites when your web site hyperlinks to their content material. Then again, they may be able to be abused via spammers for malicious functions.
To disable trackbacks and pingbacks, practice those steps:
- Log in in your WordPress admin dashboard.
- Navigate to the “Settings” segment and click on “Dialogue”.
- Within the “Default put up settings” segment, uncheck the field subsequent to “Permit hyperlink notifications from different blogs (pingbacks and trackbacks) on new posts”.

- Scroll down and click on the Save Adjustments button.
Disabling trackbacks and pingbacks prevents your WordPress web site from sending or receiving those notifications.
This is helping scale back needless server load and doable safety dangers related to unsolicited mail or malicious trackback/pingback requests.
Set Up Correct Record Permissions
The Record permissions decide the extent of get entry to and regulate other customers or processes have over your web site’s information and directories.
When record permissions are configured correctly, you’ll restrict unauthorized get entry to and save you doable safety breaches.
To arrange correct record permissions in your WordPress web site, practice those basic tips:
- Use an FTP shopper or webhosting regulate panel to get entry to your web site’s information.
- Determine the principle directories and information that want permissions adjustment, such because the wp-content listing, wp-config.php record, and .htaccess record.
- Set ‘listing’ permissions to 755, which permits the landlord to learn, write, and execute information whilst proscribing others to learn and execute solely.
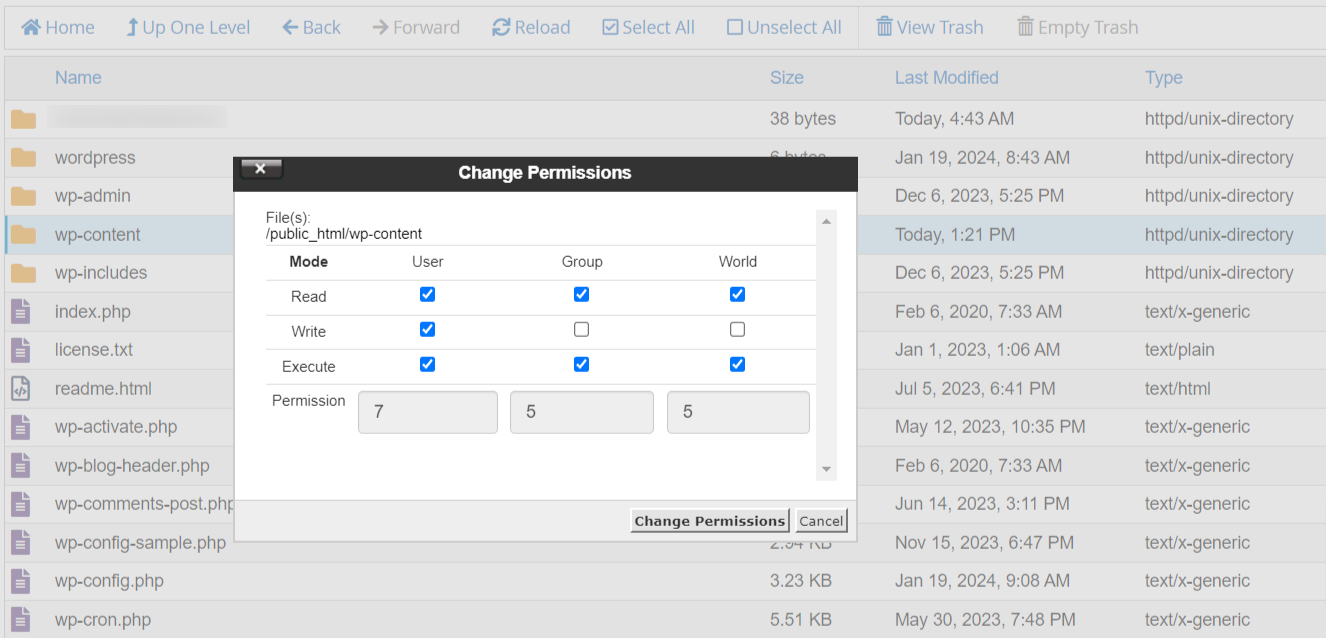
- Set ‘record’ permissions to 644, which permits the landlord to learn and write information whilst proscribing others to read-only.
- For extra delicate information, such because the wp-config.php record, set permissions to 600, which solely grants learn and write get entry to to the landlord.
That is only a basic atmosphere, so touch your webhosting supplier’s fortify for explicit steering, as beneficial record permissions would possibly range in several webhosting environments.
Disable Error Reporting
Disabling error reporting is crucial safety follow that is helping safeguard your WordPress web page via combating the prospective publicity of delicate data to attackers.
Error logs can inadvertently expose information about your web site’s configuration or underlying code, which can also be exploited via malicious folks.
To disable error reporting, practice those steps:
- Get right of entry to your web page’s root listing by means of an FTP shopper or cPanel.
- Within the root listing or public_html, to find the wp-config.php record.
- Obtain a backup replica of the wp-config.php record for protection.
- Proper-click at the wp-config.php record and make a choice ‘Edit’ to open it.
- Find the road that claims
outline('WP_DEBUG', true); - Substitute ‘true’ with ‘false,’ making it
outline('WP_DEBUG,' false);as proven beneath.
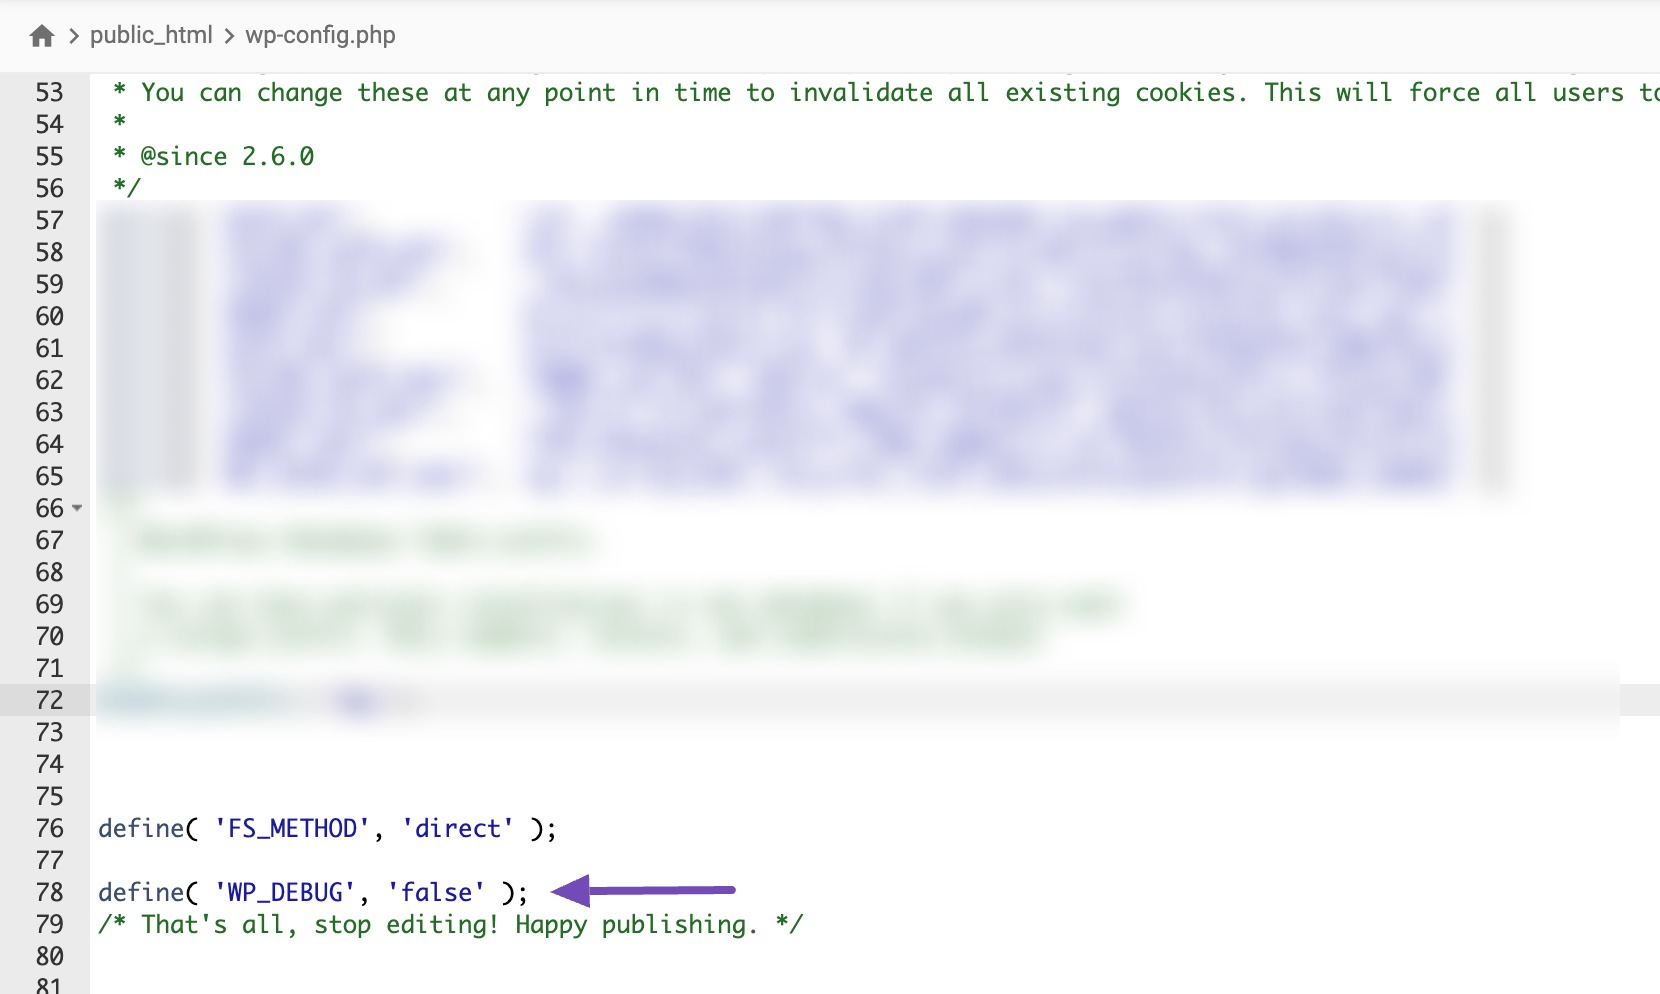
- Be sure that you save your adjustments after editing the wp-config.php record.
Disabling error log reporting prevents doable error messages or warnings from being exhibited to customers, together with delicate data that may be helpful to attackers.
Then again, disabling error reporting does now not imply you must forget about mistakes solely. You must nonetheless track your web site for any problems and deal with them promptly.
Safe Your wp-config.php Record
The wp-config.php record is a crucial element of your WordPress set up because it accommodates delicate data, equivalent to database credentials and safety keys.
Taking steps to protected this record is very important to give protection to your WordPress web page from doable safety breaches.
Listed here are some beneficial measures to protected your wp-config.php record:
- Believe transferring the wp-config.php record to a listing out of doors the internet root folder. This prevents direct get entry to to the record from the web, making it tougher for attackers to milk any vulnerabilities.
- Be sure that the record permissions for wp-config.php are correctly configured the use of the beneficial permissions mentioned previous.
- When putting in place your WordPress web site, use sturdy, distinctive, and complicated database credentials. This comprises the use of a robust database username and password.
- Upload extra coverage to the wp-config.php record via including the next regulations in your web site’s .htaccess record.
<information wp-config.php>
order permit,deny
deny from all
</information>
Those regulations can deny get entry to to the record for all IP addresses.
Disable PHP Record Execution in Positive WordPress Directories
You’ll be able to additionally fortify the protection of your WordPress web page via disabling PHP record execution in explicit directories. This is helping save you PHP information inside the ones directories from being performed or run for your web page.
To disable PHP record execution, alter the .htaccess record in goal directories, ceaselessly the place user-generated content material is living, just like the wp-content/uploads listing.
You’ll be able to do that via opening the .htaccess record in a textual content editor and including the next traces:
<Information *.php>
deny from all
</Information>
Subsequent, save this record as .htaccess and add it to /wp-content/uploads/ folders for your web page the use of an FTP shopper or Record Supervisor.
Those traces instruct the server to disclaim get entry to to any record with a .php extension throughout the specified listing.
Then again, you’ll do that with 1-click the use of the Hardening characteristic within the Sucuri plugin discussed above.
2.4 Further Safety Measures
Allow us to speak about the extra security features you’ll take to protected a WordPress web site additional.
Routinely Log Out Idle Customers in WordPress
When customers stay logged in however inactive for a definite length, it poses a menace of unauthorized get entry to or account tampering.
So, it is important to log off idle customers to mitigate this safety vulnerability.
To do that, it is important to set up and turn on the Inactive Logout plugin. Upon activation, move to Settings → Inactive Logout to configure plugin settings.
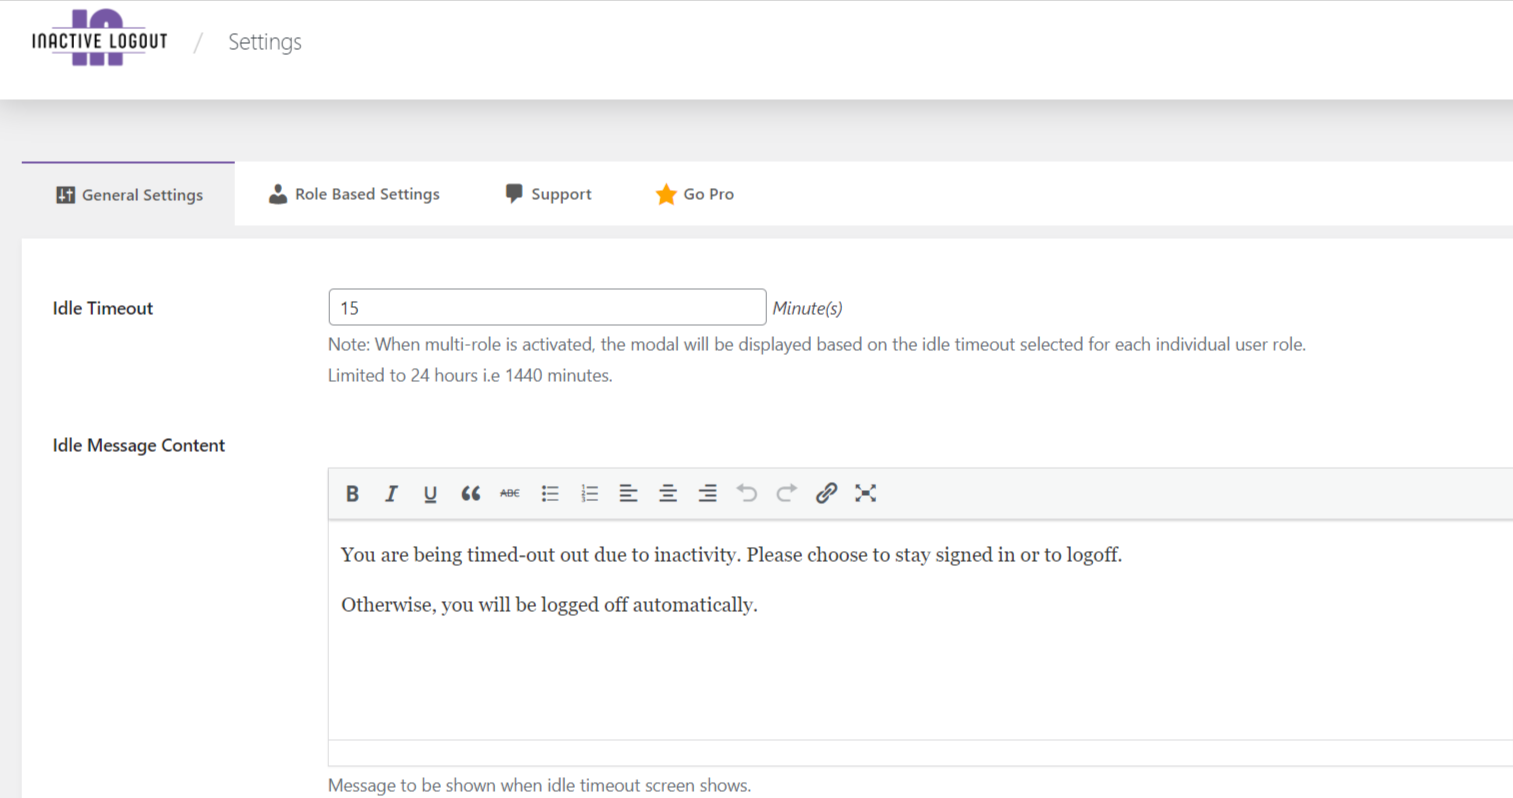
Via robotically logging out idle customers, you scale back the chance in their periods being hijacked or unauthorized adjustments being made to their accounts.
That is in particular necessary for web pages that deal with delicate data or have person accounts with administrative privileges.
Conceal the WordPress Model
Showing the WordPress model publicly could make it more uncomplicated for attackers to focus on vulnerabilities related to that particular WordPress model.
To cover the WordPress model, alter your theme’s purposes.php record or use a safety plugin.
There are a couple of other strategies to be had, however we suggest relating to our information on easy methods to disguise the WordPress model for detailed directions.
Conceal Your WordPress Web page Theme Title
When attackers can simply determine the WordPress theme you might be the use of for your web page, it turns into more uncomplicated for them to milk any recognized vulnerabilities related to that theme.
Via hiding the theme title, you are making it tougher for attackers to assemble details about your web site’s setup and doubtlessly exploit any weaknesses. This provides an additional layer of safety in your WordPress web page.
To cover your web site’s theme title, practice our step by step information on easy methods to disguise a WordPress theme title.
Disable Record Enhancing within the WordPress Dashboard
WordPress has a integrated code editor that permits you to edit your theme and plugin information out of your WordPress admin space.
If a hacker beneficial properties unauthorized get entry to in your WordPress dashboard, they will try to alter sure information via injecting malicious code.
So, we recommend disabling the characteristic as it could pose a safety danger. To do that, it is important to upload the next code in your web site’s wp-config.php record.
// Disallow record edit

outline( 'DISALLOW_FILE_EDIT', true );
As soon as this transformation is applied, customers with administrator get entry to can now not get entry to the theme and plugin editor to your WordPress admin panel.
However even after disabling this record modifying, you’ll nonetheless make adjustments in your theme and plugin information via getting access to them via FTP or Record Supervisor.
Exchange Your Default Database Desk Prefix
Via default, WordPress makes use of the prefix “wp_” for its database tables, which may make it more uncomplicated for attackers to spot and goal your web site.
To fortify safety, believe converting the desk prefix, making it tougher for doable exploits.
Adjusting the prefix comes to editing the wp-config.php record and phpMyAdmin. This handbook procedure carries a menace of breaking your web page if now not configured appropriately.
Thus, we suggest the use of the plugin way.
So, Set up and turn on the Brozzme DB Prefix & Gear Addons plugin. After activation, navigate to Gear → DB PREFIX.
Exchange the database desk prefix throughout the plugin to a novel and not more predictable aggregate of letters, numbers, and an underscore. Steer clear of particular characters or areas.
Ahead of making adjustments, again up your web page database. Make certain wp-config.php is writable for your server, and examine that MySQL ALTER rights are enabled to keep away from doable problems.
This wary method guarantees a smoother transition with minimum menace in your web site’s capability.
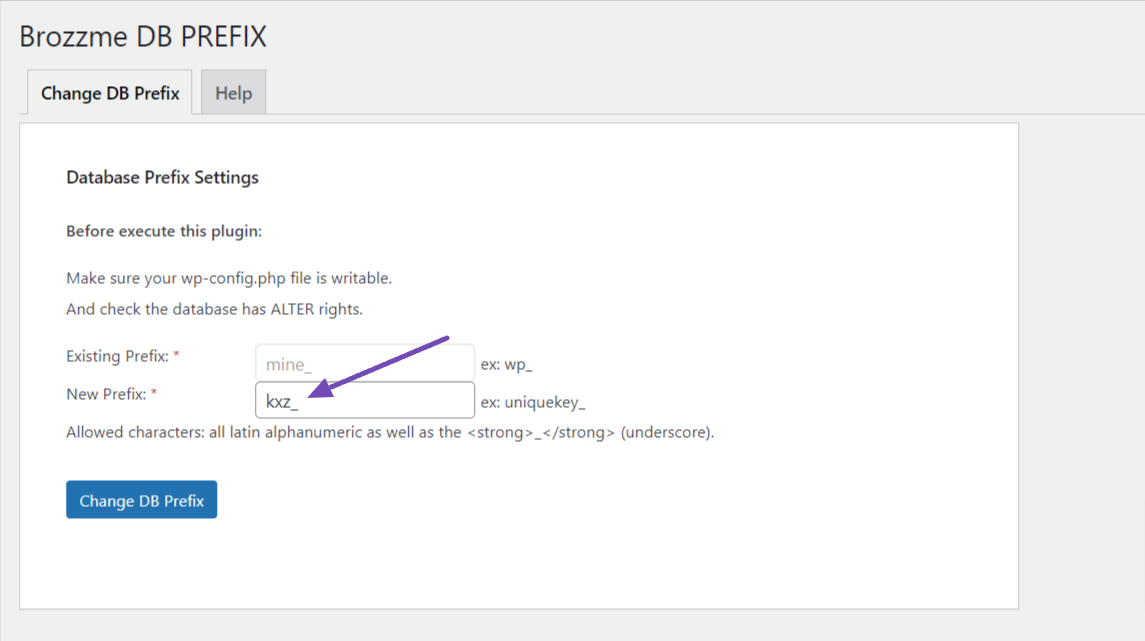
After making the vital changes, save your adjustments via clicking the Exchange DB Prefix button.
Disable XML-RPC in WordPress
XML-RPC is a WordPress characteristic that facilitates connectivity between your web site and internet or cell packages. It was once robotically enabled ranging from WordPress 3.5.
Then again, it could additionally function a possible instrument for amplifying brute-force or DDoS assaults for your web page.
With XML-RPC enabled, a hacker can use a unmarried serve as to make a couple of login makes an attempt with 1000’s of passwords, in contrast to with out it, the place separate makes an attempt can be required for every password. This poses an important safety menace.
To keep away from this menace, you might want to disable XML-RPC when you’re now not actively the use of it via including code in your web site’s .htaccess record.
Get right of entry to your web page’s information the use of an FTP shopper or your webhosting regulate panel, find the .htaccess record within the root listing, and upload the next code:
# Disable XML-RPC
<Information xmlrpc.php>
    Order Deny,Permit
    Deny from all
</Information>
However when you desire to not use this system, you’ll use a WordPress safety plugin like Easy Disable XML-RPC.
Set up and turn on the plugin, navigate to Easy Disable XML-RPC after activation, test the Disable XML-RPC possibility, and save your adjustments.
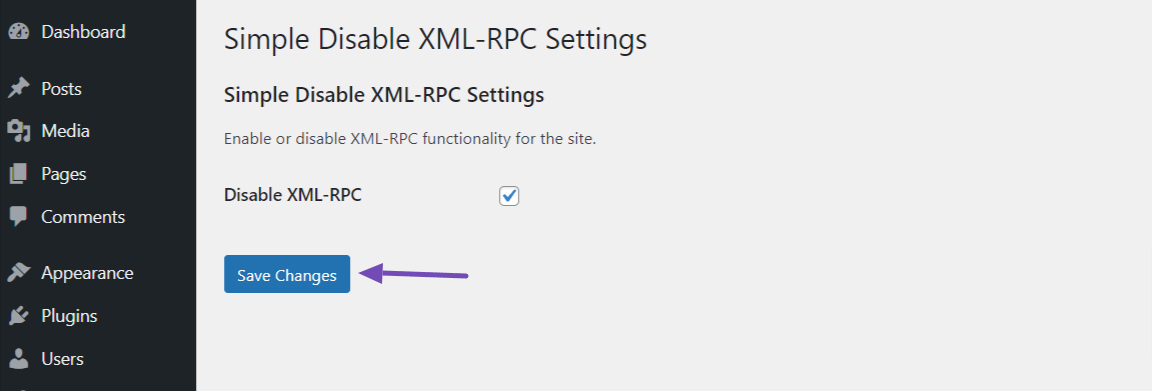
For those who’re the use of the internet software firewall discussed previous, then the firewall can handle this.
Disable Hotlinking
Disabling hotlinking is a safety measure that is helping offer protection to your web page’s bandwidth and save you others from without delay linking in your web site’s photographs and different media information.
Hotlinking refers to the use of the picture or media URLs hosted for your web page on different web pages, the use of your server’s assets with out your permission.
To simply disable hotlinking, set up and turn on the All-In-One Safety (AIOS) WordPress plugin.
As soon as activated, move to WP Safety → Filesystem Safety, and make a choice the Record coverage tab. Scroll down and turn at the Save you symbol hotlinking segment, as proven beneath.

Be mindful to avoid wasting your settings.
Disable Listing Indexing and Surfing
Disabling listing indexing and skimming is crucial safety measure that stops unauthorized get entry to to the contents of your web page directories.
Via default, some internet servers permit listing indexing, because of this that if no index record (like index.html or index.php) is found in a listing, the server will show an inventory of information and folders in that listing.
This may reveal delicate data and make it more uncomplicated for attackers to spot vulnerabilities.
To forestall unauthorized get entry to in your information, copying of pictures, and revealing your listing construction, it’s endorsed to disable listing indexing and skimming.
Get right of entry to your web page’s information via an FTP shopper or webhosting regulate panel. Within the root listing of your WordPress set up, find the .htaccess record.
Open the .htaccess record in a textual content editor and append the next code on the finish:
# Disable Listing Indexing and Surfing
Choices -Indexes
Save the adjustments to the .htaccess record and add it again in your server, changing the present record if vital.
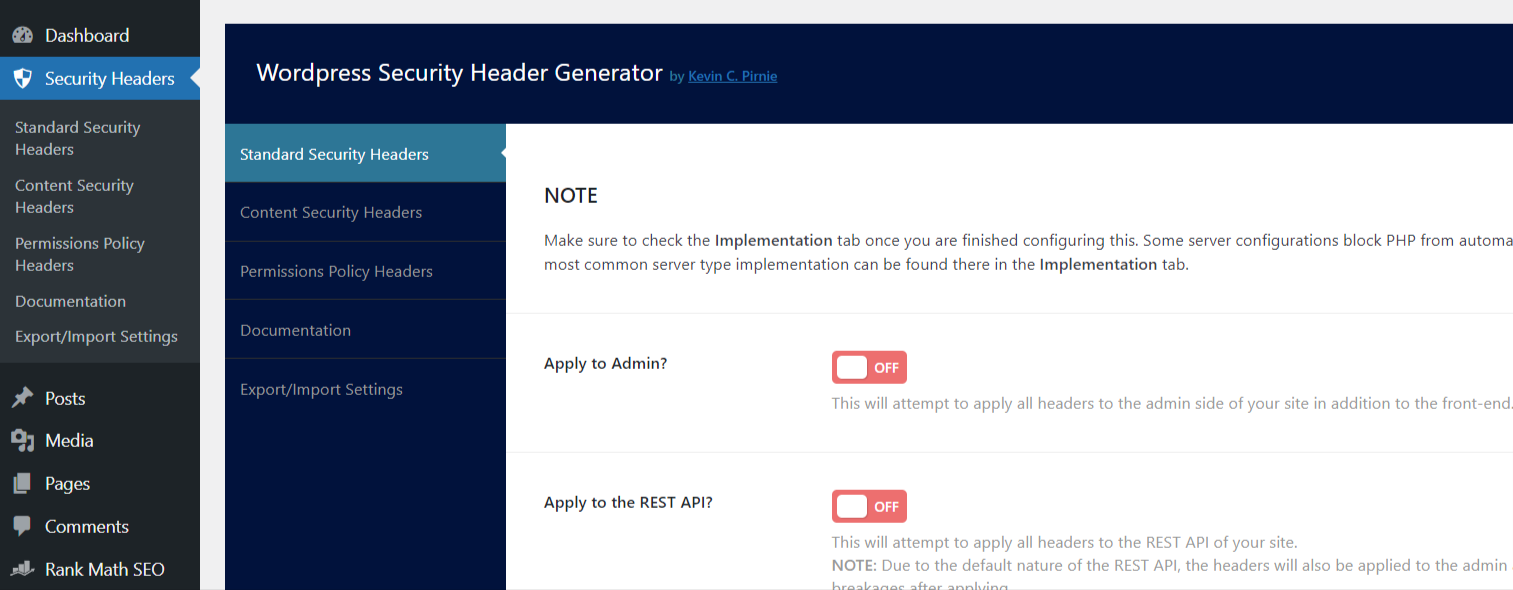
Use Safety Headers
Safety headers instruct the browser on dealing with sure facets of your web page, offering further coverage towards commonplace safety vulnerabilities.
Listed here are some commonplace safety headers and their advantages:
- X-XSS-Coverage header blocks malicious script injections to forestall cross-site scripting (XSS) assaults.
- X-Content material-Sort-Choices header prevents safety vulnerabilities led to via MIME sort sniffing.
- Strict-Shipping-Safety (HSTS) header guarantees protected connections via imposing HTTPS.
- The Content material-Safety-Coverage (CSP) header lets in atmosphere safety insurance policies to give protection to towards quite a lot of assaults.
So, to enforce those safety headers for your WordPress web page, it is important to set up and turn on the Safety Header Generator plugin.
After set up, navigate to the Safety Headers segment. There you’ll make out time and configure the plugin in your choice.
When enforcing safety headers, it’s very important to check your web page completely to make certain that they don’t warfare with any present functionalities, as they have a tendency to wreck web pages.
Additionally, you’ll use on-line gear like securityheaders.com to test the effectiveness and right kind implementation of your safety headers.
For those who use safety plugins like “All-In-One Safety (AIOS)” or “Wordfence,” you’ll configure your web site’s safety headers simply the use of their choices, getting rid of the will for the sooner plugin.
3 Conclusion
Securing your WordPress web page is the most important to give protection to it from doable threats and vulnerabilities.
Thus, putting in a strong safety plugin equivalent to “All-In-One Safety (AIOS)” can also be useful because it gives a variety of options encompassing nearly all of the protection measures mentioned on this put up.
Then again, simply putting in a safety plugin isn’t sufficient. You want to make the effort to check all to be had choices and customise the plugin’s settings to fit your wishes.
However, you probably have distinctive safety necessities now not coated via the plugin, believe putting in further plugins or using customized codes to deal with the ones wishes.
It’s at all times a excellent follow to again up your web page prior to making code adjustments or activating new plugins to mitigate dangers.
Moreover, incessantly updating your WordPress plugins, reviewing notices or effects, and staying up-to-date with the newest safety information and absolute best practices can considerably scale back the chance of a safety breach.
Did this put up lend a hand you in securing your WordPress web page? If it has, be at liberty to percentage your ideas via Tweeting @rankmathseo.
