In our earlier publish, we offered TiDB Cloud Information Carrier (TCDS), a completely controlled, low-code backend-as-a-service resolution. Through seamlessly integrating your information with any software or provider via HTTPS, TCDS permits builders to abruptly assemble protected and scalable data-driven packages.
This weblog guides you via construction REST endpoints with TCDS whilst developing a Job Tracker app. Considering backend building, the educational covers developing clusters and tables, putting information, and crafting APIs. It additionally supplies steps for integrating the React frontend hosted on Vercel with the backend. Through the top of this instructional, you’ll acquire a complete working out of TCDS and obtain a completely purposeful backend resolution catering to each newbies and seasoned builders.
Arrange a TiDB Serverless Cluster
Take the stairs beneath to create a loose TiDB Serverless cluster:
- Check in in your TiDB Cloud. Sign in a TiDB Cloud account in case you haven’t were given one.
- Practice the on-screen directions to create a loose Serverless Tier cluster inside of seconds.

Create a Information Style
- Navigate to the evaluate web page of your cluster and input the Chat2Query interface at the left.

- Execute the SQL script supplied beneath to create each the
tasktrackerdatabase and thetodosdesk inside of it. The script contains the insertion of pattern information into the todos desk. The Job Tracker software depends upon this desk to retailer person duties together with their similar data, together with name, description, standing, and timestamps.CREATE DATABASE tasktracker; USE tasktracker; CREATE TABLE todos ( `identity`INT AUTO_INCREMENT NOT NULL PRIMARY KEY, `process`VARCHAR(255) NOT NULL, `description` TEXT, `standing`VARCHAR(50) NOT NULL, `created_at` timestamp NULL DEFAULT CURRENT_TIMESTAMP, `updated_at` timestamp NULL DEFAULT CURRENT_TIMESTAMP ON UPDATE CURRENT_TIMESTAMP )ENGINE=InnoDB AUTO_INCREMENT=1 DEFAULT CHARSET=utf8mb4; INSERT INTO todos (process, description, standing) VALUES ('Grocery Buying groceries', 'Go on a spree for the week together with culmination, greens, and dairy merchandise', 'Incomplete'), ('Electronic mail Consumer', 'Ship the revised undertaking proposal to the customer by way of EOD', 'Incomplete'), ('Gymnasium Consultation', 'Attend the 6 PM aerobic health magnificence on the native gymnasium', 'Finished'), ('E book Flight Tickets', 'E book tickets for the impending industry shuttle to New York', 'Incomplete'), ('Annual Well being Checkup', 'Time table an annual well being checkup appointment with Dr. Smith', 'Finished'); SELECT * FROM todos; - Choose the entire statements within the script and execute them by way of clicking at the Run button.
Create a Information App With GitHub Integration
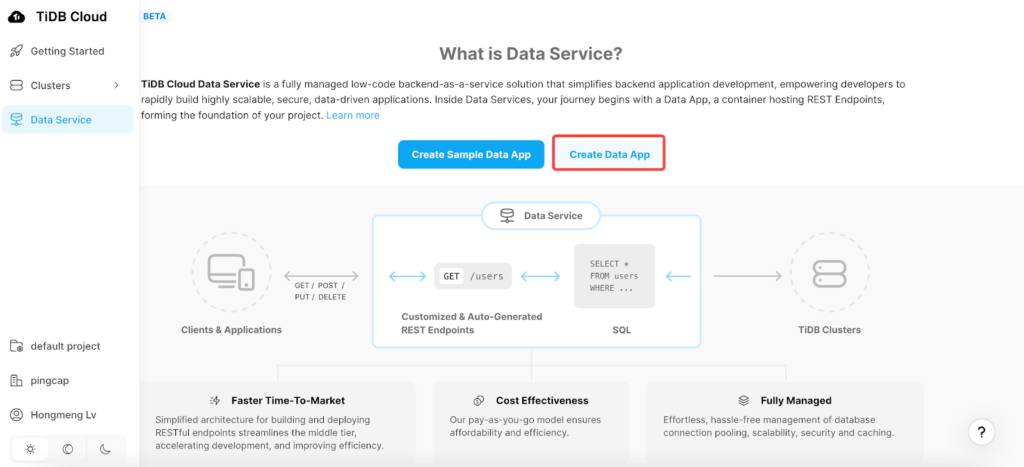
A Information App is a container that is composed of a number of gadgets like Endpoints. Making a Information App is the preliminary section for producing REST Endpoints. To create a Information App:
- Choose Information Carrier from the left navigation menu, and click on the Create Information App button.
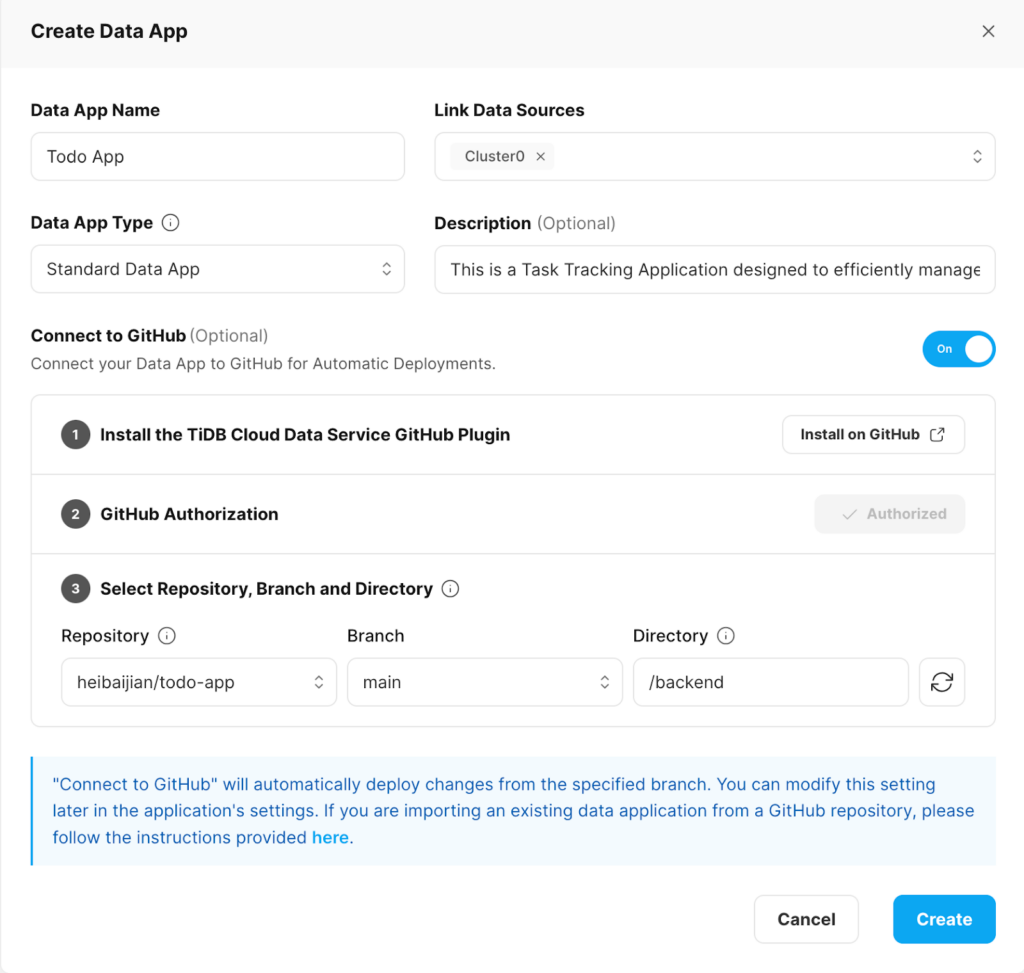
- Create and configure a regular information app as beneath:
- Title Your App: Input “Todo App” within the Information App Title box.
- Hyperlink Information Assets: Choose a cluster to go along with your app. For this situation, make a choice “Cluster0”.
- Describe your App: Within the ‘Description’ box, write “It is a Job Monitoring Utility designed to successfully set up duties.” This temporary description outlines the app’s goal.
- App Sort: Go away the ‘Information App Sort’ box at its default environment.
- Hook up with GitHub (Non-compulsory):
Through integrating with GitHub, you’ll hyperlink a GitHub repository and a selected department in your TCDS undertaking. This permits for the automated deployment of your Information App’s metadata and endpoints at once to the attached undertaking. Right here:
- Log into your GitHub account and create a todo-app for the duty tracker undertaking.
- Within the Create Information App display, practice the on-screen directions to put in Information Carrier as an software for your goal repository.
- Click on Authorize to authorize get entry to to the duty tracker software on GitHub.
- Specify the todo-app repository, department, and listing as proven within the screenshot for storing configuration information. This allows TCDS to finish the backend API advent procedure.
- Click on the Create button to create your Information App.
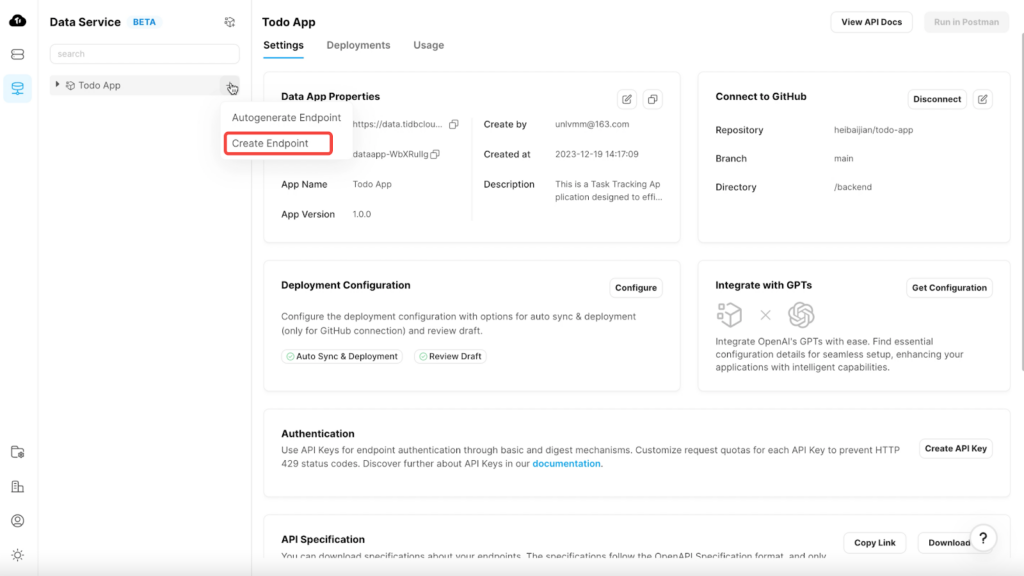
After developing the Information App, you’ll land at the Information App House web page. For first-time customers, a Getting Began with Information Carrier instructional is to be had. For this instructional, we’ll manually stroll via each and every step of making the endpoints.
Create Endpoints
This segment guides you in the course of the technique of putting in 4 HTTPS endpoints (POST, GET, PUT, DELETE) that may permit Create, Learn, Replace, and Delete (CRUD) operations at the ‘todos’ desk. For extra detailed data, consult with our documentation on developing new endpoints.
POST /todos
The POST /todos endpoint means that you can create a brand new process for the todos desk. Practice the stairs beneath to create the endpoint:
- Start up the endpoint advent: At the left navigation bar of the Todo App, click on the “+” image and choose the Create Endpoint choice.
- Configure the endpoint houses. Navigate to the Houses tab:
- Input the Trail as “/todos“. Set the Request Approach to POST.
- The endpoint identify is routinely generated from the trail price entered by way of default.
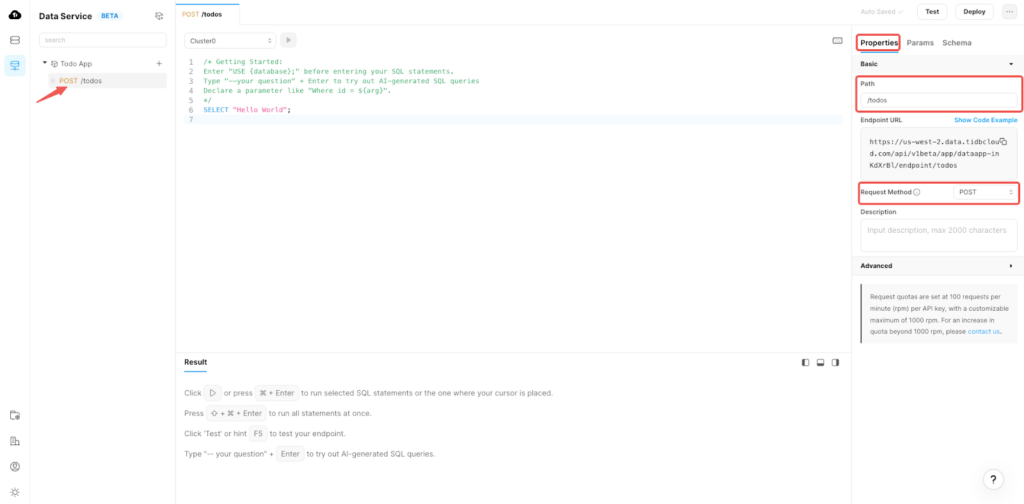
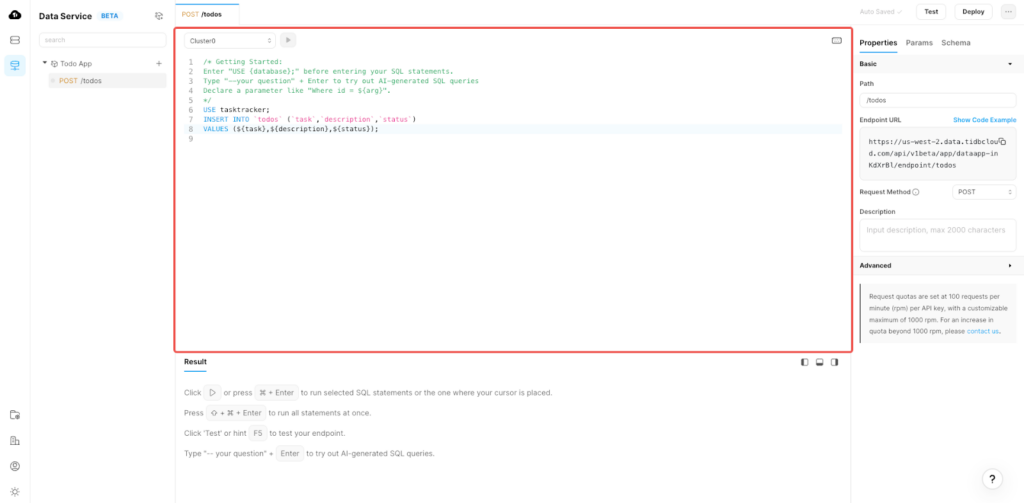
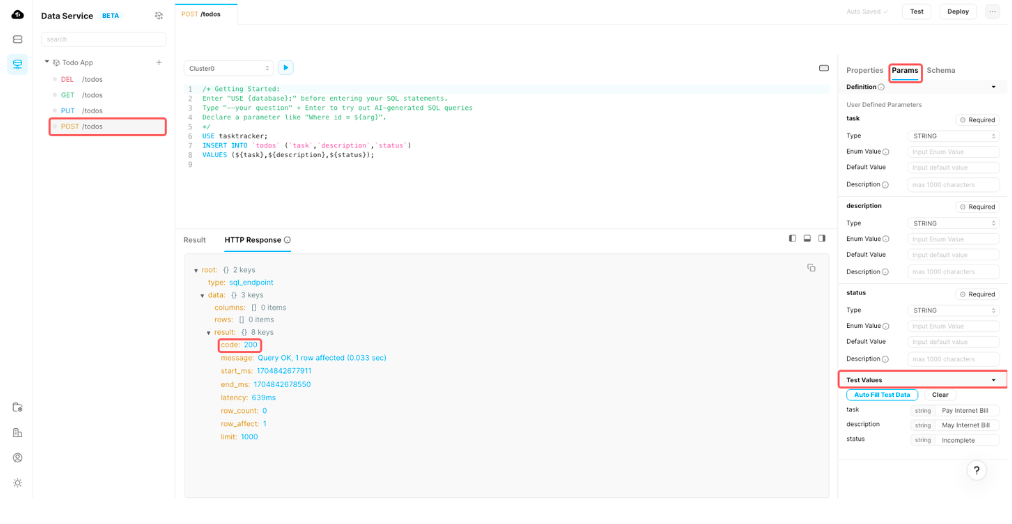
- Configure SQL: The SQL configuration defines the industry good judgment for the endpoint. For this endpoint, use the next SQL script to insert a brand new process document:
USE tasktracker;
INSERT INTO `todos` (`process`,`description`,`standing`)
VALUES (${process},${description},${standing});
Reproduction the SQL script into the natively supplied SQL Editor window:
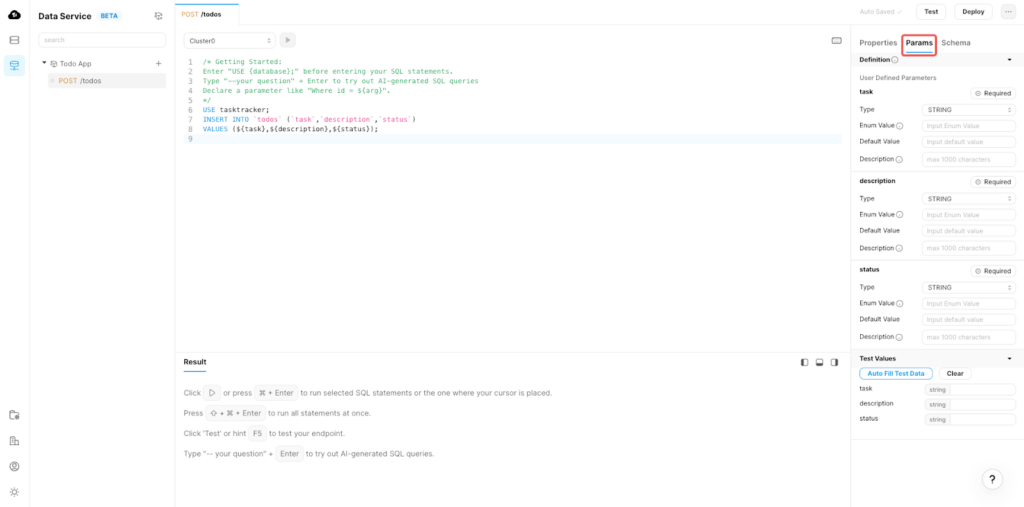
- Configure endpoint parameters: Parameters are variables that upload flexibility in your endpoint. They’re routinely generated. You’ll make changes to fit your explicit wishes.
Navigate to the Params tab to discover a lot of configuration choices:- Set Required to make a parameter obligatory. Align parameter sorts together with your information type.
- Non-compulsory settings come with enum price, default price, and description. For our todos endpoint, default parameter settings are generally ok. Discuss with our documentation for complete main points on configuring endpoint parameters.
Congratulations on effectively developing your first POST /todos endpoint! Now, let’s create the remainder endpoints with a identical process.
GET /todos
The GET /todos endpoint retrieves all duties saved in our todos desk. Practice those steps to successfully create and configure this endpoint:
- Navigate to the Houses tab to configure the endpoint houses:
- Input the Trail as /todos.
- Set the Request Approach to GET (default).
- Reproduction the next SQL script into the SQL Editor window:
 USE tasktracker;
 SELECT * FROM `todos` ;
Observe: This endpoint does now not have any parameters.
PUT /todos
The PUT /todos endpoint updates a job, particularly when the duty standing adjustments. Practice those steps to successfully create and configure this endpoint:
- Navigate to the Houses tab to configure endpoint houses:
- Input the Trail as “/todos“.
- Set the Request Approach to PUT.
- Reproduction the next SQL script into the SQL Editor window:
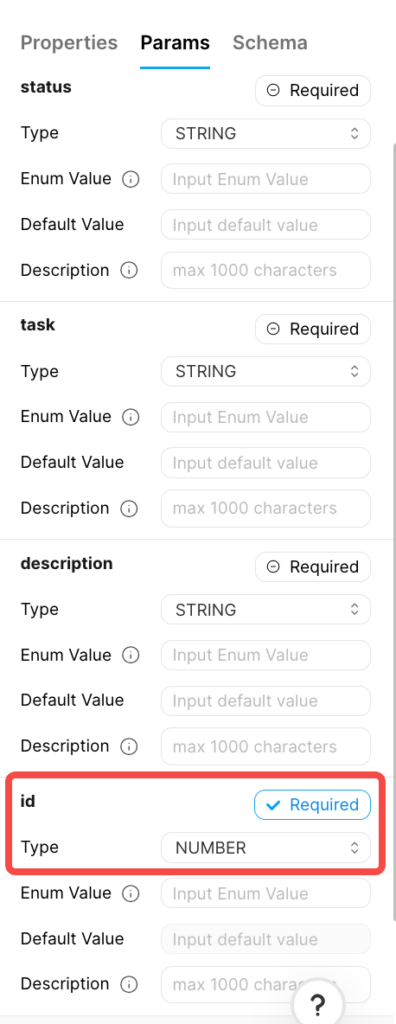
USE tasktracker; UPDATE `todos` SET `standing` = IF(duration(${standing})>0,${standing},`standing`), `process` = IF(duration(${process})>0,${process},`process`), `description` = IF(duration(${description})>0,${description},`description`) WHERE `identity` = ${identity} ; - The above SQL script makes use of the identity of each and every process for identity and updates. Subsequently, it’s very important to as it should be configure the ID parameters as beneath:
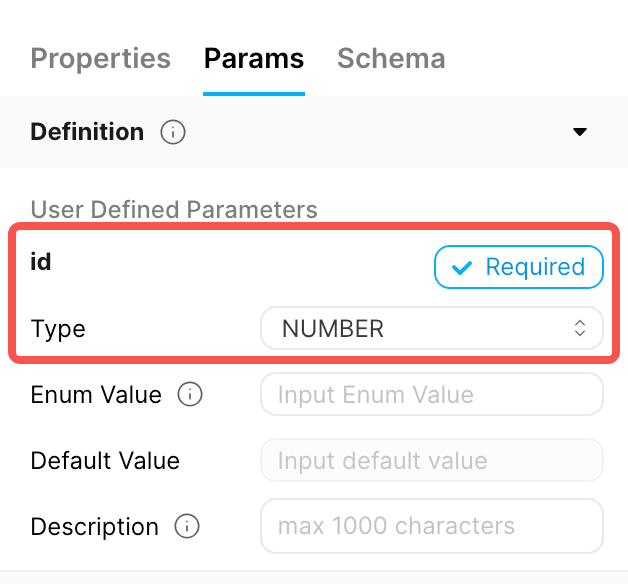
- Set the identity parameter as Required.
- Trade its kind from the default string to Quantity. This aligns with the identity box’s kind within the todos desk.
DEL /todos
The DELETE /todos endpoint deletes duties. Practice those steps to successfully create and configure this endpoint:
- Navigate to the Houses tab to configure endpoint houses:
- Input the Trail as /todos.
- Set the Request Approach to DELETE.
- Reproduction the next SQL script into the SQL Editor window:
USE tasktracker; DELETE FROM `todos` WHERE `identity` = ${identity} ; - Use the similar environment because the PUT /todos endpoint to configure endpoint parameters:
- Set the identity parameter as Required.
- Trade its kind from the default string to Quantity. This aligns with the identity box’s kind within the todos desk.
Checking out the Endpoints
Prior to we combine the brand new endpoints into the true software, it’s vital to check them in the neighborhood to make sure that they serve as as anticipated. Let’s use the POST /todos endpoint for instance to steer you in the course of the checking out procedure:
- Within the Endpoints checklist, choose POST /todos.
- Below the Params tab, navigate to the Check Values segment and configure the take a look at values as beneath:
- Input “Pay Web Invoice” for the duty.
- Enter “Might Web Invoice” for the outline.
- Input “Incomplete” for standing.
- After configuring the take a look at price, click on the Check button at the higher proper nook of the display.
POST /todos endpoint. In the similar manner, validate the remainder endpoints to make sure the whole robustness and reliability of your software.Deploy the Endpoints
After thorough checking out, it’s time to deploy your endpoints to lead them to out there to exterior shoppers. Right here’s how you’ll deploy each and every endpoint:
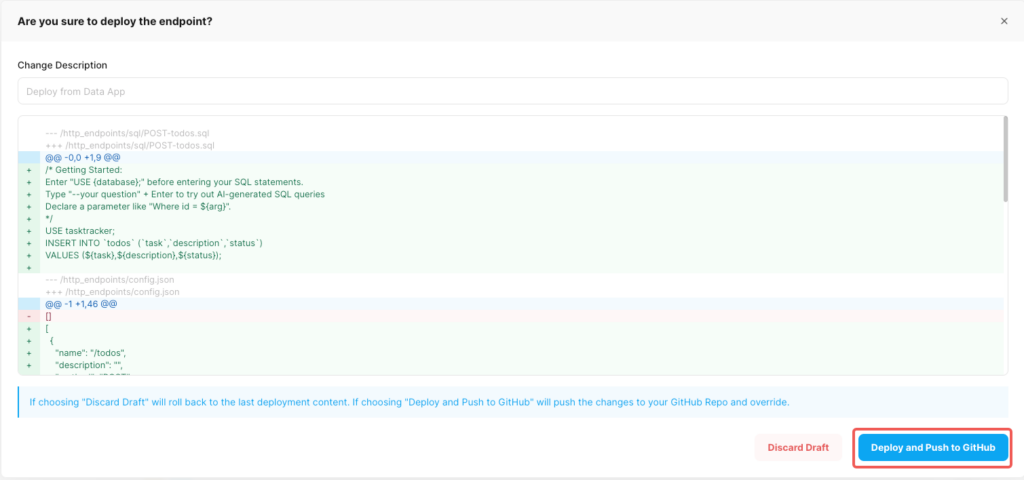
- At the best proper nook, click on the Deploy button. A Evaluate Adjustments conversation will pop up.
- Carry out a last verification of your edits to make sure the whole lot is configured as it should be.
- Click on the Deploy and Push to GitHub button. This makes the endpoint publicly to be had and pushes the adjustments in your GitHub repository.
- Repeat the similar deployment procedure for the remainder endpoints.
- Navigate to GitHub to ensure if the backend/http_endpoints folder, which you configured previous, incorporates configuration information for the deployed endpoint.
Create an API Key
Prior to exploring your new endpoints, you’ll want to arrange an API Key for protected authentication. Right here’s learn how to create one:
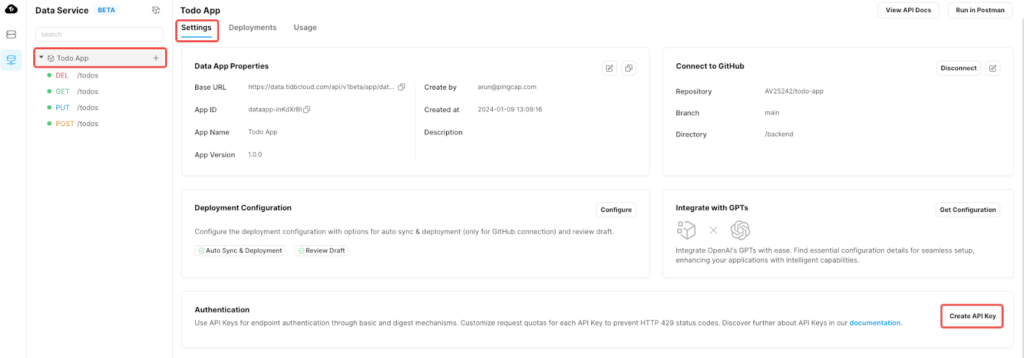
- Click on at the Todo App to navigate in your Information App’s house web page.
- Within the Settings menu, in finding the authentication segment and click on the Create API Key button.
- Within the Create API Key popup window, specify the next:
- Description: Enter “TaskTrackerKey”.
- Position: Set the function to “ReadAndWrite”.
- Click on Subsequent to generate a Public Key and a Personal Key. Reproduction and securely retailer each keys in a protected and simply out there position.
- Click on Finished to go back to the Information App house display.
Your API Secret’s now effectively created and in a position to be used in authentication together with your newly created endpoints.
Discover Your Endpoints
Together with your API Key in position, it’s time to discover the capability of your newly created endpoints. There are two number one strategies for this:
- API Medical doctors: Make the most of the integrated Swagger documentation in TCDS.
- Postman: Leverage the built-in Postman reinforce inside of TCDS.
For this instructional, we will be able to use API Documentation by way of Swagger UI. For main points on Postman integration, consult with our documentation.
- At the Information App house web page, click on View API Medical doctors. The API Medical doctors window pops up and gifts the API documentation generated via Swagger UI.
- Within the best proper nook, click on the Authorize button to authorize the endpoint get entry to. You are going to be the use of the API keys you acquired from the former step.
- Input the Public Key because the username.
- Input the Personal Key because the password.
This concludes the method of making our backend software.
You’ll now create, retrieve, replace, and delete information within the todos desk the use of the protected endpoints in the course of the POST, GET, PUT, and DELETE strategies.
Visualize Job Tracker With Vercel
Congratulations! You’re only some steps clear of finishing your process tracker app. To finalize the frontend presentation, we’ll deploy the use of Vercel. Detailed deployment steps are to be had within the GitHub Readme and Vercel’s documentation.
- Combine frontend code: Practice those steps to replicate the frontend code in your personal repository.
- Configure Vercel undertaking: After you’ve built-in the frontend code, it’s time to configure your Vercel undertaking.
- Deploy Vercel undertaking. With all configurations in position, you are actually in a position to deploy your undertaking on Vercel. This ultimate step will deliver your process tracker app to lifestyles, making it out there on-line.
Conclusion
TCDS gives a user-friendly, scalable, and dependable platform for software construction and control. As showcased on this information, TCDS permits the swift advent of CRUD endpoints, facilitating speedy software building and deployment.