On this weblog, I want to percentage a couple of highest practices for developing extremely safe packages in Mule 4 (safety at more than a few ranges/layers — software, information, and so on.) for all deployment choices.
Lots of the configuration main points (related to safety) shared listed here are taken from MuleSoft documentation/articles/blogs.
Let me get started with the concept that of protection intensive, which is a multi-layered safety technique advisable via all cloud carrier suppliers.
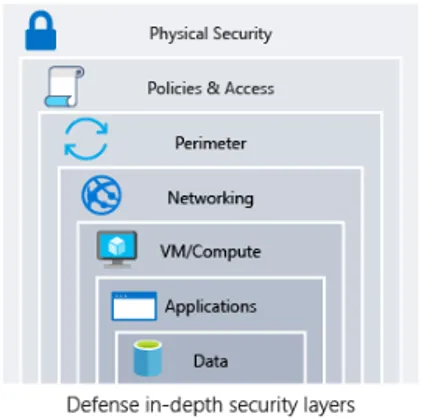
Protection intensive is a cybersecurity technique that comes to imposing more than one layers of safety features to offer protection to a company’s data methods and information. The theory in the back of Protection in Intensity is to create more than one boundaries that an attacker should triumph over, making it more difficult for them to breach the machine.
At Platform/Insurance policies and Get right of entry to Layer
1. Accessibility Regulate/Get right of entry to Control
Use Anypoint Get right of entry to Control to create your Anypoint Platform account or configure a federated Exterior Identification. As well as, you’ll configure get entry to and permissions inside of your company and organize the customers and roles in accordance with your get entry to point.
- Safe or restrict get entry to to more than a few Anypoint Platform options.
- Grant permissions in accordance with the Theory of Least Privilege (POLP) that limits customers’ get entry to rights to just what is precisely required to do their jobs.
Person Control
A. Grant Minimal Required Permissions to Customers
Org. Admin. manages person get entry to the usage of groups or roles (deprecated) or via granting permissions to customers in my opinion.
Via default, in each and every new group and enterprise organization, you’ll assign the next:
- API permissions: Make a choice the title of the API you wish to have to provide get entry to to, then pick out a model and permission.
- Runtime supervisor permissions: Make a choice the title of the Runtime Supervisor setting to provide get entry to to, then pick out permission.
- Groups: Make a choice the title of the staff to provide get entry to to.
Steps To Apply (The use of the Groups Function)
- Log in to Anypoint Platform the usage of an account that has the group administrator’s permission.
- Within the navigation bar or the principle Anypoint Platform web page, click on Get right of entry to Control.
- Within the Get right of entry to Control navigation menu, click on Customers.
- Click on the title of the person to which you wish to have to assign permissions.
- Click on the Permissions tab.
- Within the Permissions part, click on Upload Permissions. The Upload Permissions window seems.
- Within the Make a choice Permissions part, make a selection the permissions that you wish to have so as to add after which click on Subsequent.
- Within the Make a choice Industry Teams part, make a selection the enterprise teams to which you wish to have to use the permissions. Should you decided on a permission that permits you to make a choice environments, you’ll make a selection which environments to use to the permission. Click on Subsequent.
- Within the Evaluation part, evaluate the permissions and the enterprise teams and environments to which they practice, after which click on Upload Permissions.
B. Disable or Delete Any Undesirable Person(s)
Steps To Apply
Log in to Anypoint Platform the usage of an account that has the group administrator’s permission.
- Within the navigation bar or the principle Anypoint Platform web page, click on Get right of entry to Control.
- Within the Get right of entry to Control navigation menu, click on Customers.
- Towards every person you wish to have to disable/delete, click on the extra movements menu (3 dots (…) menu). Then make a selection both Disable person or Delete person.
- If the Disable person is chosen, a affirmation conversation pops up. Click on Verify.
- If the Delete person is chosen, a affirmation conversation pops up. Input the title of the person after which click on Delete.
NOTE: The disable/delete movements may also be carried out via clicking the title of every person within the Customers list display screen (after Step #3) after which settling on the specified motion from the extra movements menu (… menu) provide on the best appropriate nook of the chosen person display screen.
C. Set up Exterior Customers Who Want Get right of entry to to Public APIs
- When you are making an API portal public, customers from some other Anypoint Platform group should sign in Jstomer packages to name your API. When those customers log in on your public developer portal, they’re thought to be exterior customers as a result of they’re out of doors of your company.
- When a person logs into Anypoint Platform for the primary time, they’re robotically added to the Exterior Customers (Public portal get entry to) tab. From this tab, you’ll view a listing of all exterior customers. You’ll be able to additionally allow or disable every of those exterior customers from this display screen. While you disable an exterior person, they may be able to now not log in on your public portal.
- You can not seek for exterior customers as a result of those customers don’t belong on your group and do not need further permissions. To grant customers permission to accomplish duties like deploying an software, you should invite the person to enroll in your company.
Industry Staff (BG) Control
Industry Teams (BGs) are self-contained useful resource teams that comprise Anypoint Platform assets akin to packages and APIs.
BGs aren’t enabled via default in a brand new Anypoint Platform account. To turn on BGs to your group, touch your MuleSoft consultant. There’s a restrict of 100 BGs in line with group.
A. Set up Get right of entry to to BG(s)
Steps To Apply
- Within the Get right of entry to Control navigation menu, click on Industry Teams.
- Click on the title of the enterprise organization you wish to have to get entry to.
The Settings part seems, appearing information about the basis group or enterprise organization. - Click on the Get right of entry to Evaluate tab.
The Get right of entry to Evaluate part seems, showing a listing of all customers with any permissions within the present enterprise organization via default. - Use the drop-downs to specify:
CustomersorGroups- Permissions (looked after via product
- Industry organization
5. Make a choice the person for which you wish to have to switch permissions/disable person/delete person.
B. Delete Any Undesirable BG(s)
Steps To Apply
- Within the Get right of entry to Control navigation menu, click on Industry Teams.
- Click on the title of your root group.
- Click on the … menu subsequent to the enterprise organization to delete.
- Within the affirmation conversation, input the title of the enterprise organization after which click on Delete.
Group (Root) Control
While you create an Anypoint Platform account, a Root Group is created, and you might be assigned as the landlord of the group — Group Proprietor.
The extent of get entry to customers need to more than a few assets is determined by their assigned roles and permissions.
A. Safe Your Group
As an Org. Admin., carry out beneath duties to safe the Group:
- Create required groups (Refer right here for the information and steps on easy methods to create Groups).
- Assign customers to related groups or roles that outline their permissions (Refer right here for the stairs on easy methods to assign customers to Groups).
- Take away customers, if required (Refer above ‘Disable or Delete undesirable customers’ subsection for the stairs on easy methods to delete customers).
- Create required enterprise teams to delegate control of the assets and outline the scopes of roles and permissions (Refer right here for the stairs on easy methods to create BG).
- Alternate homeowners of industrial teams.
- Configure security-related group settings.
B. Configure Consultation Timeout Correctly
Steps To Apply
- Log in to Anypoint Platform the usage of an account that has the Group Administrator’s permission.
- Within the navigation bar or the principle Anypoint Platform web page, click on Get right of entry to Control.
- Within the Get right of entry to Control navigation menu, click on Industry Teams.
- Click on the title of your root group.
- Click on the Settings tab.
- Adjust the consultation timeout: Set the correct amount of time (in mins) a person is inactive prior to they’re robotically logged out of the Anypoint Platform. The default is 60 mins, the minimal is quarter-hour, and the utmost is 180 mins.
Setting Control
Anypoint Platform lets you create and organize separate deployment Environments for APIs and packages.
You can not grant customers get entry to to an atmosphere without delay. To grant a person get entry to to an atmosphere, use function permissions.
A. Affiliate a Shopper Supplier With the Setting
Should you didn’t affiliate a consumer service with the surroundings whilst you created it, the default Jstomer service is the Anypoint Platform Jstomer service.
Steps To Apply
- Log in to Anypoint Platform the usage of an account that has the Group Administrator’s permission.
- Within the navigation bar or the principle Anypoint Platform web page, click on Get right of entry to Control.
- Within the Get right of entry to Control navigation menu, click on Industry Teams.
- Click on the title of your root group.
- Click on the Environments tab.
- Click on the title of our surroundings.
- Within the Shopper Supplier box, make a selection no less than one Jstomer service.
- Should you added a couple of Jstomer service, click on Set as default to designate a default Jstomer service.
- Click on Replace.
B. Delete Any Undesirable Setting(s)
Steps To Apply
- Log in to Anypoint Platform the usage of an account that has the Group Administrator’s permission.
- Within the navigation bar or the principle Anypoint Platform web page, click on Get right of entry to Control.
- Within the Get right of entry to Control navigation menu, click on Industry Teams.
- Click on the title of your root group.
- Click on the Environments tab.
- Click on the title of our surroundings.
- Click on Delete to delete the surroundings.
Permission Control
Permissions are assigned the usage of Groups or roles (deprecated) or via granting permissions to customers in my opinion.
- The Groups function lets you create teams of customers after which assign the participants of the ones teams positive permissions throughout more than one enterprise teams.
As an Group Administrator, you’ll create and adjust groups and assign cascading permissions in line with organizational construction.
- Every function (deprecated) accommodates a listing of permissions that outline what a person with that function can do with the precise assets it scopes.
Sure roles come with a collection of default permissions.
- Relying at the product, you’ll grant permissions without delay to a selected person with out the desire for roles or groups — extra fine-grained keep an eye on.
NOTE: For the listing of permissions that may be assigned to Groups, granted to particular person customers, or mixed to create roles (deprecated), refer right here.
Workforce Control
The Groups function lets you create teams of customers after which assign the participants of the ones teams positive permissions.
An Group will have as much as 1000 groups. Groups can also be nested as much as 10 ranges, together with the ‘Everybody at <Root Group>’ staff.
A. Grant Minimal Required Permissions Inside of Workforce(s)
For the stairs to observe, refer above ‘Grant Minimal Required Permissions to Customers — the usage of Groups function’ subsection.
B. Assign Person Kind — Workforce Member or Workforce Maintainer Correctly
You should have the Group Administrator’s permission or be a Workforce Maintainer your self to switch Workforce Contributors and Workforce Maintainers.
You’ll be able to designate a Workforce Maintainer to delegate staff repairs obligations to customers with out giving them complete group administrator permissions, or you’ll take away the Workforce Maintainer designation and convert customers again to Workforce Contributors.
Steps To Apply
- Log in to Anypoint Platform the usage of an account that has the Group Administrator’s permission or is a Workforce Maintainer of the staff you wish to have to switch.
- Within the navigation bar or the principle Anypoint Platform web page, click on Get right of entry to Control.
- Within the Get right of entry to Control navigation menu, click on Groups.
- Within the Contributors part, navigate to the person you wish to have to designate as a staff maintainer.
- Within the Kind drop-down, make a selection both Maintainer or Member.
C. Delete Any Undesirable Workforce(s)
Steps To Apply
- Log in to Anypoint Platform the usage of an account that has the Group Administrator’s permission.
- Within the navigation bar or the principle Anypoint Platform web page, click on Get right of entry to Control.
- Click on … subsequent to the staff that you wish to have to delete.
- Click on Delete….
- Input the title of the staff that you wish to have to delete.
- Click on Delete.
Position Control
A job is a collection of predefined permissions controlling get entry to to every product or function throughout the Anypoint Platform. Relying at the product, you’ll use predefined roles with same old permissions, or you’ll specify your individual permissions for every function.
Roles are set just for particular person customers.
Roles are actually deprecated in choose of the Groups function, however you’ll nonetheless organize roles the usage of enterprise teams. You grant maximum roles as permissions as an alternative.
Multi-Issue Authentication (MFA) Control
Multi-factor authentication (MFA) supplies an extra layer of verification for Anypoint Platform customers. MuleSoft calls for MFA when customers get entry to the Anypoint Platform, both without delay with their Anypoint credentials or by way of Unmarried Signal-On (SSO).
MFA is enabled for direct logins and will’t be grew to become off on the group point.
When a person logs in with their Anypoint credentials, they should input their password after which test their identification with such a verification strategies:
- 3rd-party TOTP authenticator apps
- Integrated authenticator
- Safety key
- Salesforce Authenticator
A. Adjust Verification Manner
Steps To Apply
- Log in to Anypoint Platform.
- Within the Anypoint Platform navigation bar, click on the circle icon that accommodates the initials related along with your Anypoint Platform account.
- Within the drop-down, click on Profile.
- Click on Configure multi-factor authentication (MFA).
The Set up Your Verification Strategies interface seems. - If you wish to sign in an extra verification approach:
a. Subsequent to the verification approach you wish to have to configure, click on Upload.
b. Apply the directions to configure your most popular verification approach.
c. Click on Accomplished.
6. If you wish to take away a verification approach:
a. Subsequent to the verification approach you wish to have to take away, click on the bin icon.
b. Click on Sure.
c. Click on Accomplished.
7. Click on Save.
B. Reset MFA
You’ll be able to reset MFA for particular person customers if a tool is compromised or misplaced.
If you’re the one group member with Group Administrator permission and feature misplaced get entry to on your verification strategies, touch buyer enhance.
Steps To Apply
- Log in to Anypoint Platform the usage of an account that has the Group Administrator’s permission.
- Within the navigation bar or the principle Anypoint Platform web page, click on Get right of entry to Control.
- Within the Industry Teams menu, make a selection your root group.
- Within the Get right of entry to Control navigation menu, click on Customers.
- Click on the person whose multi-factor authentication configuration you wish to have to reset.
- Click on Reset multi-factor authentication.
- Click on Verify reset MFA.
Subsequent time the person logs in to Anypoint Platform, they’re induced to configure a brand new verification approach.
Identification Control
Because the Anypoint Platform group administrator, you’ll configure Identification Control in Anypoint Platform to arrange customers for unmarried sign-on (SSO).
A company will have as much as 25 exterior identification suppliers, or IdPs, configured for SSO.
Configure identification control the usage of probably the most following SSO requirements:
- OpenID Attach: Finish person identification verification via an authorization server, together with SSO.
- SAML 2.0: Internet-based authorization, together with cross-domain SSO.
A. Upload Identification Supplier(s)
Steps To Apply
- Log in to Anypoint Platform the usage of an account that has the Group Administrator’s permission.
- Within the navigation bar or the principle Anypoint Platform web page, click on Get right of entry to Control.
- Within the Get right of entry to Control navigation menu, click on Identification Suppliers.
- Click on Upload Identification Supplier, after which make a selection the identification service sort you wish to have so as to add. Make a selection probably the most following:
- OpenID Attach: For the stairs on easy methods to configure, refer right here.
- SAML 2.0: For the stairs on easy methods to configure, refer right here.
B. Delete Any Undesirable IDP(s)
Steps To Apply
- Log in to Anypoint Platform the usage of an account that has the Group Administrator’s permission.
- Within the navigation bar or the principle Anypoint Platform web page, click on Get right of entry to Control.
- Within the Get right of entry to Control navigation menu, click on Identification Suppliers.
- Subsequent to the identification service you wish to have to delete, click on the … menu.
- Click on Delete…
- Within the API Replace window, click on Proceed.
- Input the title of your identification service.
- Click on Delete.
Shopper Control
Anypoint Platform acts as a Shopper Supplier via default, however you’ll additionally configure exterior Jstomer suppliers to authorize Jstomer packages. As an API proprietor, you’ll practice an OAuth 2.0 coverage to authorize Jstomer packages that attempt to get entry to your API. You wish to have an OAuth 2.0 service to make use of an OAuth 2.0 coverage.
A company will have as much as 25 exterior Jstomer suppliers to authorize Jstomer packages.
A. Upload Shopper Supplier(s)
Steps To Apply
- Log in to Anypoint Platform the usage of an account that has the Group Administrator’s permission.
- Within the navigation bar or the principle Anypoint Platform web page, click on Get right of entry to Control.
- Within the Get right of entry to Control navigation menu, click on Shopper Suppliers.
- Click on Upload Shopper Supplier, after which make a selection the shopper service sort you wish to have so as to add. Make a selection probably the most following:
- OpenAM: For the stairs on easy methods to configure, refer right here.
- PingFederate: For the stairs on easy methods to configure, refer right here.
- OpenID Attach: For the stairs on easy methods to configure, refer right here.
- Azure Lively Listing: For the stairs on easy methods to configure, refer right here.
B. Delete Any Undesirable Shopper Supplier(s)
Steps To Apply
- Log in to Anypoint Platform the usage of an account that has the Group Administrator’s permission.
- Within the navigation bar or the principle Anypoint Platform web page, click on Get right of entry to Control.
- Within the Industry Teams menu, make a selection your root group.
- Within the Get right of entry to Control navigation menu, click on Shopper Suppliers.
- Click on the title of the client-provider you wish to have to delete.
- At the Jstomer service’s web page, click on Delete.
- Input the title of the shopper identification service title.
- Click on Delete.
Sooner than you delete a consumer service, make certain that you do not need APIs, property, or environments that rely at the Jstomer service, or you’ll lose capability.
Attached Apps Control
The Attached Apps function supplies a framework that permits an exterior software to combine with the Anypoint Platform the usage of APIs via OAuth 2.0 and OpenID Attach.
Attached Apps assist person delegate their get entry to with out sharing touchy credentials or giving complete keep an eye on in their packages to 3rd events.
- OAuth can authorize get entry to (by way of get entry to token) to assets with out revealing person credentials (Jstomer identification and Jstomer secret) to apps.
- OpenID Attach identifies the top person and obtains data to go to OAuth 2.0 Attached Apps.
Attached Apps deal with use circumstances for the next kinds of customers:
- Org. Admin.: Regulate how their group’s information is utilized by allowlisting apps, revoking get entry to, and disabling this option for all the group.
- Developer (having Org. Admin. permission): Sign in new (and organize present) apps inside of their group.
- Finish person: Authorize apps to get entry to specific data, akin to viewing property in Anypoint Trade.
Best root-level group directors can view and organize hooked up apps.
A. Create a Attached App With Right kind Grant Kind and Scope
Best builders who’ve the group administrator permission can create apps and specify get entry to scopes within the Anypoint Platform.
Steps To Apply
- Log in to Anypoint Platform the usage of an account that has the Group Administrator’s permission.
- Within the navigation bar or the principle Anypoint Platform web page, click on Get right of entry to Control.
- Within the Get right of entry to Control navigation menu, click on Attached Apps.
- Within the Owned Apps part, click on Create App.
- Within the Create App web page, configure Grant varieties and Scopes correctly:
- Grant varieties: The grant varieties for use with this app. For more information., refer right here.
- Scopes: The extent of permissions to supply to this app. Click on Upload Scopes to make a choice the scopes. For more information., refer right here.
6. Click on Save.
B. Configure Limited Authorization Coverage
Steps To Apply
- Log in to Anypoint Platform the usage of an account that has the Group Administrator’s permission.
- Within the navigation bar or the principle Anypoint Platform web page, click on Get right of entry to Control.
- Within the Get right of entry to Control navigation menu, click on Attached Apps & then the Authorizations part.
- Click on the Configure button.
- Make a selection restricted: Best Attached Apps licensed via an admin can also be approved via group participants to behave on their behalf possibility. When you select this feature, the appliance allowlist is enabled, and all present software authorizations are added robotically.
NOTE: For more information. on Software Allowlist, refer right here.
Via default, the Unrestricted authorization coverage is enabled.
C. Take away Undesirable Attached Apps
Steps To Apply
- Log in to Anypoint Platform the usage of an account that has the Group Administrator’s permission.
- Within the navigation bar or the principle Anypoint Platform web page, click on Get right of entry to Control.
- Click on Attached Apps after which the Authorizations part.
- Click on the … icon subsequent to an software to take away the app out of your group. While you revoke an app’s get entry to, the app’s OAuth 2.0 get entry to tokens and refresh tokens are revoked, and the app can now not get entry to person information.
Audit Logging/Control
Adjustments made via customers inside of Anypoint Platform organizations are logged via an Audit Logging carrier. You’ll be able to get entry to the information logs in the course of the Audit Logging Question API or in the course of the Audit Logging UI.
Key Issues About Audit Logs
It supplies a query-able historical past of movements carried out throughout the Anypoint Platform.
- It helps to keep monitor of all customers who’ve interacted with items within the machine and timestamps the ones movements.
- It supplies mechanisms for querying the set of customers who’ve carried out movements, the set of items that had movements carried out on them, and different endpoints that allow the querying of log entries.
Audit logs have a default retention length of 1 12 months.
Customers who’ve the Group Administrator and Audit Log Config Supervisor permission can customise the retention length.
A. Get right of entry to Audit Logs
The audit log carrier is business-group mindful, because of this you spot best logs which are related on your personal enterprise organization.
Steps To Apply
- Log in to Anypoint Platform.
- Within the navigation bar or the principle Anypoint Platform web page, click on Get right of entry to Control.
- Within the Get right of entry to Control navigation menu, click on Audit Logs.
- The Audit Logs web page presentations the logs. You’ll be able to:
- Obtain audit logs.
- Set a time frame for audit logs to show.
- Filter out audit logs via product, sort, and movements.
- Seek audit logs via setting, object, and person.
NOTE: For more information. at the contents of Audit Logs, refer right here.
Exterior Get right of entry to Control
The Exterior Get right of entry to function allows separate organizations to collaborate within the Anypoint Platform. For e.g., organizations can percentage API specs, connectors, and different property in Anypoint Trade with every different with out making them public.
Key Issues About Exterior Get right of entry to
- Directors keep an eye on which organizations their customers can collaborate with via keeping up a listing of depended on organizations in Get right of entry to Control.
- Each organizations should are living in the similar keep an eye on aircraft, and have confidence should be established between organizations prior to permissions can also be granted.
- Permissions shared between organizations are granted on the group point.
A. Upload Relied on Organizations
So as to add a company on your configuration, you should know its Anypoint area.
Steps To Apply
- From the Get right of entry to Control house web page, click on the Exterior Get right of entry to tab.
- At the Exterior Get right of entry to web page, click on Upload Group.
- Input the original area title of the group you wish to have to percentage permissions with.
- Click on Upload.
B. Take away Undesirable Organizations
Steps To Apply
- From the Get right of entry to Control house web page, click on the Exterior Get right of entry to tab.
- Within the Exterior Get right of entry to web page, make a selection … subsequent to the title of the group you wish to have to take away.
- Click on Take away group.
- Click on Sure, take away.
2. Insurance policies Enforcement: API Supervisor
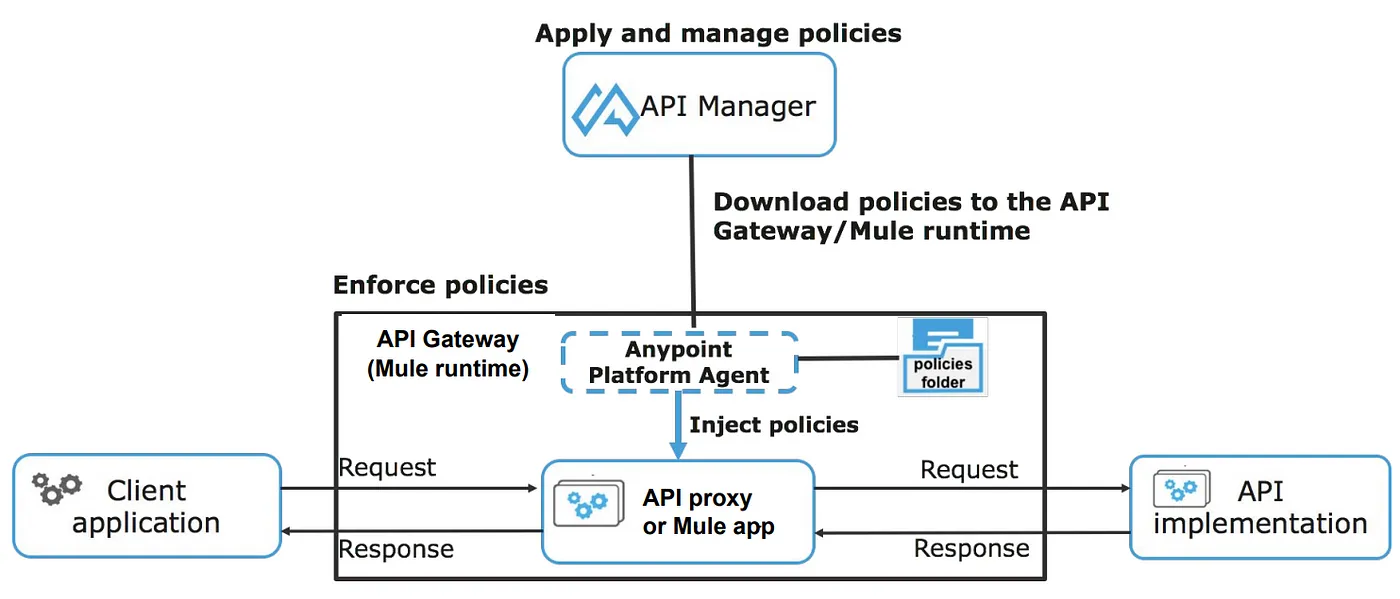
Insurance policies enforcement the usage of API Supervisor (the usage of Mule Gateway)
Regardless of the Gateway runtime (Mule Gateway, Flex Gateway, or Provider Mesh) you select, making use of/configuring insurance policies stay the similar.
Safety-Similar Coverage Varieties
- Shopper ID enforcement: Calls for approved Jstomer packages to make use of a consumer identification and Jstomer secret.
- Authentication/Authorization:
- OAuth 2.0 token enforcement API insurance policies.
- Elementary Authentication — LDAP/Easy.
- JWT.
- IP-based get entry to keep an eye on: Blacklisting/Whitelisting.
- Tokenization: Tokenization/Detokenization of decided on touchy fields.
- Payload danger coverage: Guard towards assaults sending over-sized JSON/XML request our bodies.
Computerized Insurance policies
Use Computerized Insurance policies to put in force safety necessities via making use of the similar insurance policies to all APIs operating in Mule. With coverage automation, you’ll temporarily design, construct, and deploy safe and constant APIs.
Customers with Group Admin, Setting Admin, or with a task to Set up Insurance policies within the setting can create, edit, and delete Computerized Insurance policies.
A. Observe Computerized Coverage
Prerequisite(s)
Person with both:
- Org. Admin. permission
- Setting permission
- Set up Insurance policies function
Steps To Apply
- In API Supervisor, make a selection Computerized Insurance policies from the left navigation menu.
- Click on Upload Computerized Coverage.
- Make a choice the supplied safety coverage — Elementary Auth Easy, Elementary Auth LDAP, OAuth2.0, IP Allowlist, IP Blocklist, JSON Risk Coverage, XML Risk Coverage, JWT Validation, Schema Validation, Tokenization, Detokenization (closing two acceptable just for RTF deployment style) that you wish to have to configure.
- Click on Subsequent.
- Configure the chosen coverage accordingly. For information. on easy methods to configure insurance policies, refer right here for Mule Gateway or refer right here for Flex Gateway.
- Underneath the Rule of Packages sub-section (after increasing Complicated choices), select the correct runtime a number of the indexed and enabled runtime choices:
- Flex gateways
- Mule gateways
7. Click on Observe.
API-Stage Insurance policies
Until differently configured, insurance policies are, via default, implemented to all the API. Insurance policies with this granularity are known as API-level Insurance policies.
B. Observe API-Stage Coverage
Prerequisite
Person with both:
- Org. Admin. permission
- Setting permission
- Set up Insurance policies function
Steps To Apply
- Cross to API Supervisor.
- In API Management, click on the title of the API to which to use a coverage.
- From the left navigation menu, click on Insurance policies.
- Click on + Upload coverage.
- Make a choice the Safety coverage to use & click on Subsequent.
- Configure the specified configuration parameters. For information. on coverage configuration parameters, refer right here.
- Click on Observe.
Useful resource-Stage Insurance policies
You’ll be able to enforce an extra point of coverage granularity, one by which get entry to is managed in accordance with a criterion. Insurance policies with this granularity are known as Useful resource-level Insurance policies. On the useful resource point of granularity, insurance policies are implemented to just the ones requests that fit the standards.
C. Observe Useful resource-Stage Coverage
Prerequisite
Person with both:
- Org. Admin. permission
- Setting permission
- Set up Insurance policies function
Steps To Apply
- Cross to API Supervisor.
- In API Management, click on the title of the API to which to use a coverage.
- From the left navigation menu, click on Insurance policies.
- Click on + Upload coverage.
- Make a choice the Safety coverage to use & click on Subsequent.
- Configure the specified configuration parameters. For coverage configuration parameters, refer right here.
- Amplify Complicated choices.
- Underneath Manner & useful resource stipulations, make a selection Observe configuration to precise API approach & assets.
- Make a choice the process — GET, POST, PUT, and so on. out of the listing.
- Configure the URI template regex box. You’ll be able to specify a typical expression (regex) to incorporate more than one paths whilst you practice a coverage to a subset of assets uncovered via an API. For more information., refer right here.
Customized Insurance policies
If you wish to practice a brand new coverage on your API that isn’t integrated within the default set of insurance policies, you’ll create and use a Customized Coverage. Customized Insurance policies are insurance policies that any one can broaden and practice to their APIs, with the purpose of extending present capability or defining new ones.
Customized Coverage Workflow (Steps to Apply)
- Expand the coverage (Safety-related).
- Bundle the coverage.
- Add the ensuing coverage property to Trade.
- Observe the coverage to any API via API Supervisor.
NOTE: For information. on easy methods to create a Customized coverage and different connected configurations, refer right here.
3. Continual Queues Encryption
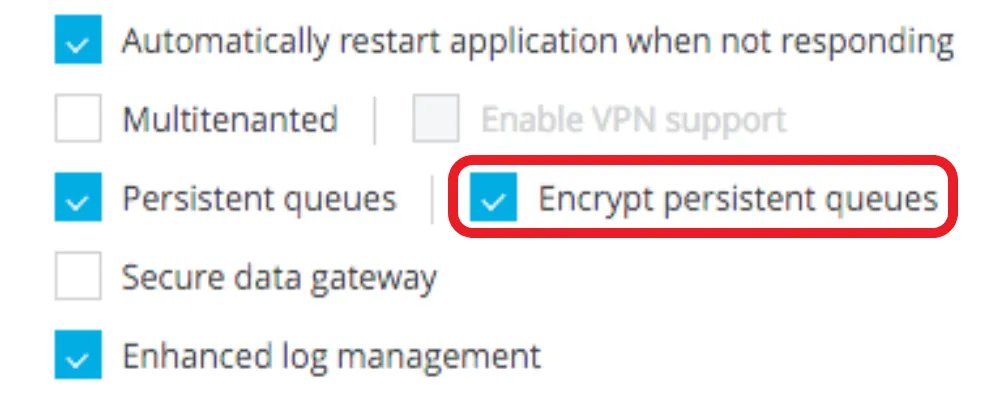
A. Encrypt Continual VM Queues (Appropriate for CloudHub Deployment Possibility Best)
You’ll be able to allow data-at-rest encryption for all of your power queues. Via enabling this option, you make certain that any shared software information written to a power queue is encrypted, permitting you to satisfy your safety and compliance wishes.
Steps To Apply
- Login to Anypoint Platform the usage of an account that has an entitlement to allow power queue encryption.
- Cross to Runtime Supervisor.
- Whilst deploying an software this is the usage of power VM queues, allow the choice Encrypt power queues for Continual queues. See beneath:
B. Encrypt Anypoint MQs
You’ll be able to allow data-at-rest encryption for all of your Anypoint MQs additionally.
Steps To Apply
- Log in to Anypoint Platform and click on MQ within the navigation menu.
- Click on Locations.
- Click on the Upload icon to show the menu
- Make a choice Queue or FIFO Queue.
- Entire the fields in Create Queue or Create FIFO Queue — Be sure to turn-on the Encryption box so that every one messages within the queue are encrypted:
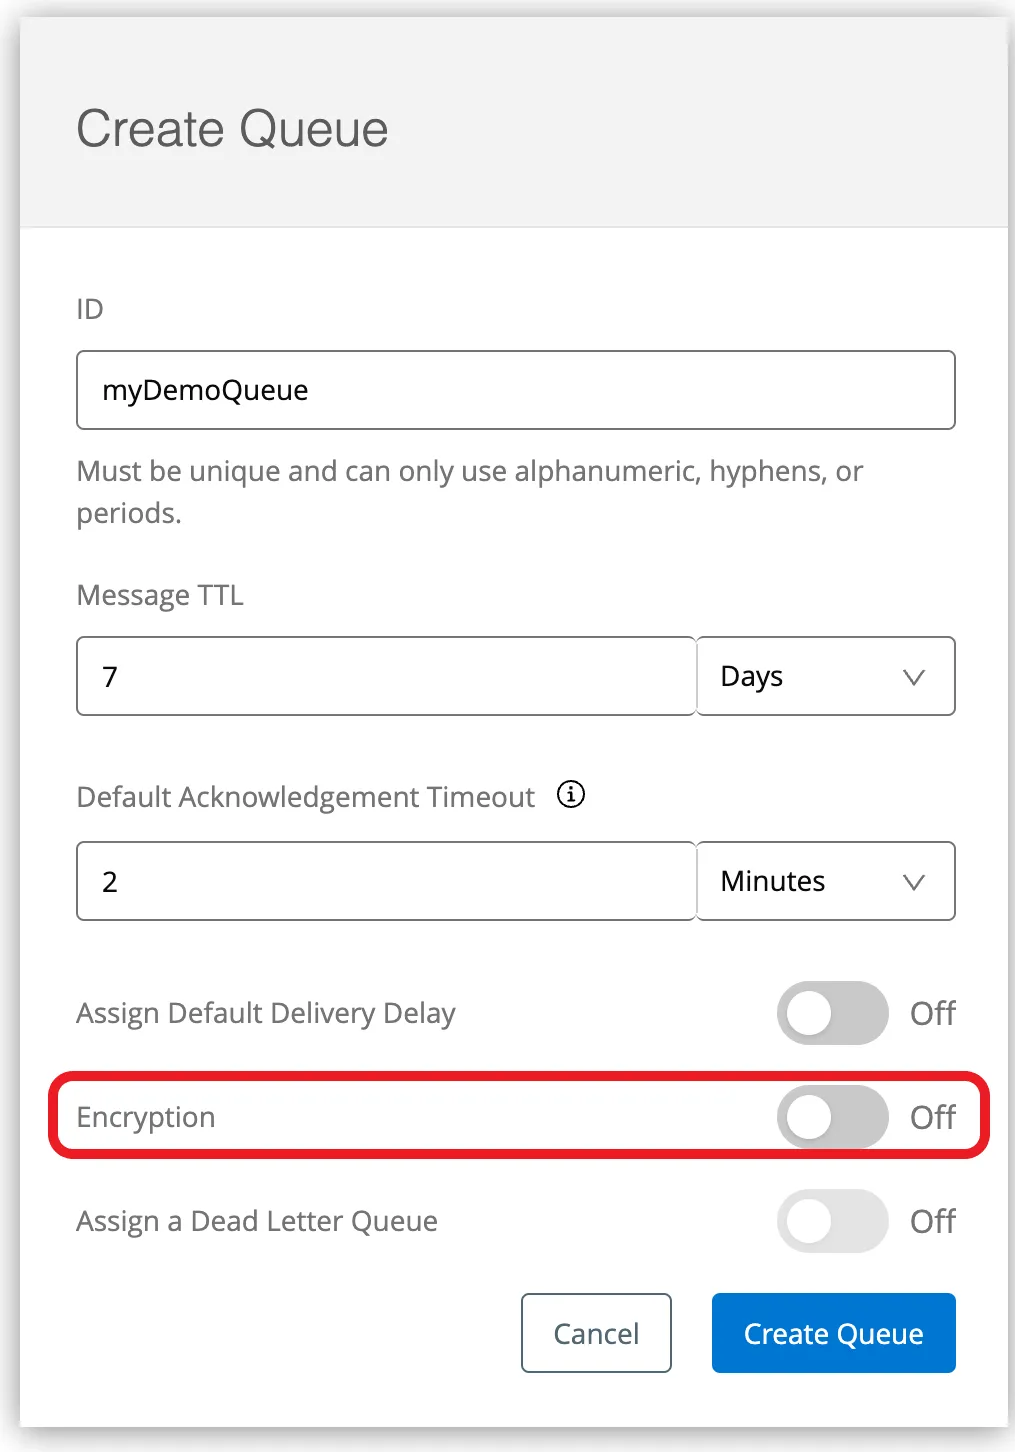
Enabling Anypoint MQ encryption possibility
In Perimeter Layer
4. Complicated Safety — Anypoint Safety (Appropriate to Rtf Deployment Possibility Best)
Anypoint Safety supplies complicated safety to your APIs and integrations to offer protection to touchy information and forestall threats on the edge. It supplies:
- Edge safety: Assemble layers of protection with swiftly configured, enterprise-grade Edge gateways. Save you denial of carrier (DoS), content material, and OWASP Most sensible 10 assaults the usage of policy-driven chokepoints that may be deployed in mins.
- Computerized hardening: Get seamless integration between Edge and API gateways, which robotically hit upon API assaults, escalates them to the fringe, and updates protections to get rid of vulnerabilities.
- Delicate data detection: Get signals when touchy data — akin to PII, PHI and bank card information — is in API payloads. Streamline auditing and governance with prebuilt tracking dashboards.
- Computerized tokenization: Meet compliance necessities quicker with a easy, format-preserving tokenization carrier that protects touchy information whilst supporting downstream dependencies.
- Computerized insurance policies: Implement standardized insurance policies throughout environments, audit deployed insurance policies for compliance, and bridge the space between safety and DevOps groups via empowering API homeowners to hit upon out-of-process adjustments and proper violations.
- Standardize get entry to: Identify same old API patterns for authentication and authorization and make patterns to be had as fragments to advertise reuse as an alternative of writing new, doubtlessly insecure code.
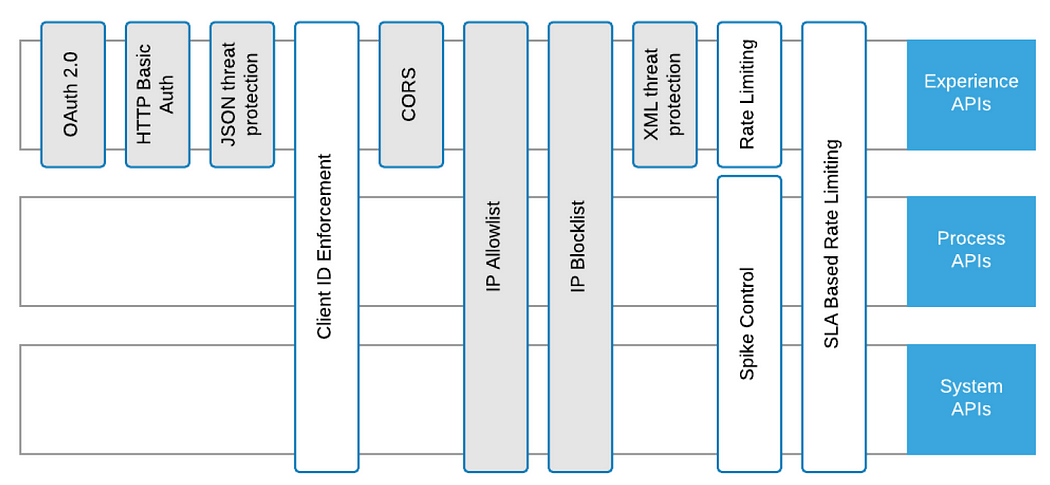
Edge-Stage Safety Insurance policies
You’ll be able to use Anypoint Safety’s Edge-level Safety Insurance policies to regulate all visitors on your Runtime Cloth and leverage API Supervisor insurance policies to additional put in force & practice particular behaviors to precise APIs. See beneath:
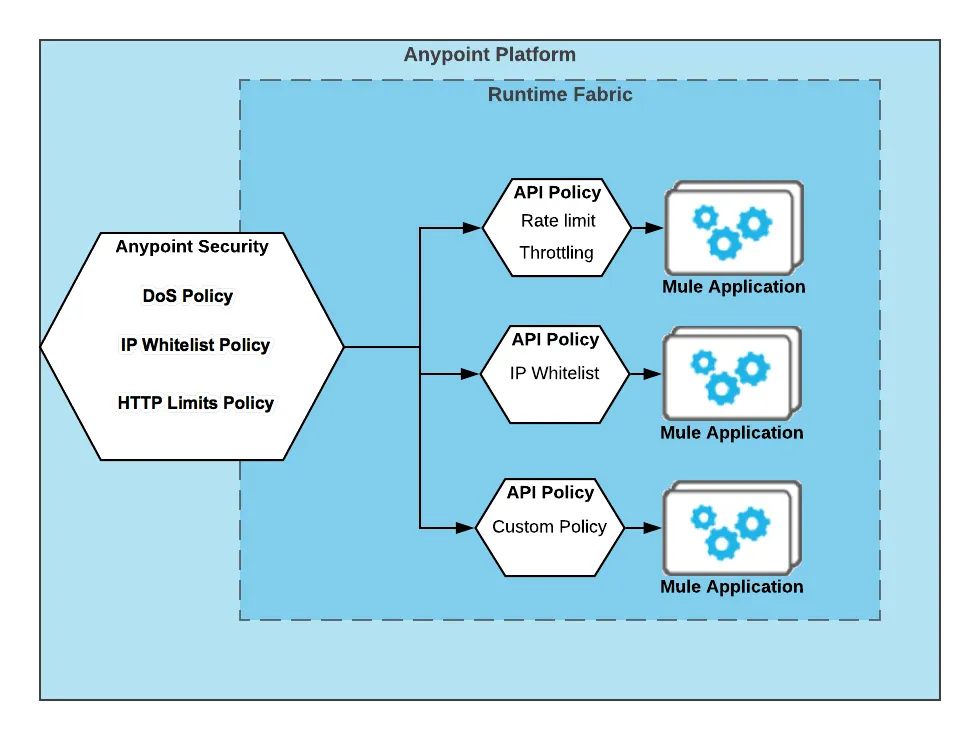
Anypoint Safety’s Edge-level Safety Insurance policies
Edge-level Safety Insurance policies come with:
- Risk detection and prevention:
- Content material assault prevention (HTTP header and message limits tests)
- Denial of Provider
- IP allowlists
- Complicated TLS (certificates pinning, CRL)
- Elementary TLS (Mutual TLS, SSL Termination)
Must haves (Commonplace for All Coverage Varieties)
- Have the Anypoint Safety — Edge entitlement.
- Have Runtime Cloth on VMs/Naked Steel with inbound visitors configured.
- Allow inbound visitors on Runtime Cloth.
A. Observe IP Allowlist Coverage
Steps To Apply
- Navigate to Anypoint Safety.
- Click on Create Coverage, and make a selection IP Allowlist.
- Upload a reputation to your coverage within the Title box.
- Underneath IP Allowlist, click on Upload IP.
- Insert the variety of IP addresses to the listing. You should use the CIDR layout for a spread of IP addresses.
So as to add extra IP deal with levels, click on Upload IP once more. - Click on Save Coverage.
B. Observe Denial of Provider Coverage
While you create a Denial Of Provider (DoS) coverage, you configure a time span and motion to take when the mistake varieties you configure are encountered. If the coverage encounters extra mistakes than your configured threshold coming from the similar IP deal with, the coverage can both drop the relationship silently (doesn’t strive the TLS connection), or drop the relationship in an instant and go back a 503 error.
The DoS coverage determines the supply of the request within the following 3 ways:
- TCP Message — supply IP deal with.
- Supply IP deal with header box.
- Proxy Protocol IP deal with.
For the reason that supply of the request is in accordance with the IP deal with, if an an attacker spoofs the supply IP deal with, the DoS Coverage can’t save you the assault.
Steps To Apply
- Navigate to Anypoint Safety, click on Create Coverage, and make a selection Denial Of Provider.
The method of making use of a DOS Coverage has six other monitors. - Click on Normal at the left navigation bar:
a. Upload a reputation to your coverage within the Title box.
b. Arrange a time period, in seconds, in Rule A Time Length.
This time period is the brink at which your coverage starts to dam requests if it encounters the collection of mistakes that you simply configure for every form of error.
c. Use the Max Assets To Track box to arrange a most collection of IP addresses to trace.
The DoS coverage can also be configured to trace as much as 500000 IP addresses.
d. Use the Reject Message Motion drop-down menu to make a choice the kind of reaction the coverage returns when shedding a consumer connection. You will have two choices:
- Drop silently: The coverage drops the relationship silently and avoids making the TLS handshake altogether. The coverage avoids making the relationship for the TCP packets with a supply IP deal with in AWS ELB Proxy Protocol headers or for the supply IP deal with taken from the TCP packet. That is the most productive approach to terminate the shopper’s connection, because the coverage avoids studying the attacker’s request.
- Ship HTTP 503: The coverage terminates the relationship and returns a
503 (Provider Unavailable)reaction to the shopper. This calls for a TLS connection to be made, which is resource-expensive.
3. Now, you’ll configure your coverage to do so for the other error varieties.
NOTE: For more information. on
- Laws, Thresholds, and Escalations refer right here.
- For mappings of coverage violations and blunder escalations, refer right here.
- Error varieties refer right here.
C. Observe HTTP Limits Coverage
HTTP Limits Coverage prevents an attacker from sending huge messages that may eat bandwidth and doubtlessly motive efficiency degradation or denial of carrier. This coverage limits the dimensions of TCP protocol messages, paths, headers, and footers. This coverage does no longer carry out tests at the content material of a message.
Steps To Apply
- Navigate to Anypoint Safety, click on the Create Coverage icon, and make a selection Content material Assault Prevention.
- Upload a reputation to your coverage within the Title box.
- Configure the next parameters to your coverage:
- Most message dimension: The default most message dimension allowed is 104857600 bytes. Adjust this price in accordance with the necessities of your software via surroundings the utmost dimension to a worth in accordance with a dimension your APIs can maintain. To forestall attackers from abusing request frame checking and onerous assets, select the smallest price that satisfies your necessities.
- Most trail duration: The default most trail dimension allowed is 4096 bytes.
- Most duration of a unmarried header: The default most header duration allowed for is 16384 bytes.
- The utmost duration of a unmarried trailer: The default most trailer duration allowed is 16384 bytes.
- Most collection of headers and trailers: The default most collection of headers and trailers allowed is 32 kB.
4. To permit best particular HTTP strategies, upload them within the Allowed HTTP Request Strategies box. Legitimate HTTP strategies are GET, POST, PATCH, HEAD, TRACE, OPTIONS, DELETE, and PUT.
5. Click on Save Coverage.
D. Observe Internet Software Firewall (WAF) Coverage
The Internet Software Firewall (WAF) Coverage is to be had for request and reaction visitors to supply coverage on the Internet software point.
WAF insurance policies are absolutely built-in with the present Anypoint Safety coverage DoS (Denial of Provider). When the WAF coverage detects mistakes, it triggers the thresholds configured within the DoS, which can also be optionally configured to take movements akin to shaping or blockading visitors for an IP deal with from a malicious supply.
Steps To Apply
- Signal into Anypoint Platform and navigate to Anypoint Safety.
- Within the Safety Insurance policies web page, click on Create Coverage and make a selection Internet Software Firewall (WAF).
- Input a Title for the coverage and click on Save Coverage.
The coverage seems within the Safety Insurance policies listing, the place you’ll edit and delete insurance policies. - Configure the principles to permit or block request visitors on your internet software:
a. Within the menu at the left, click on Request Rulesets. All of the regulations are disabled via default. For every rule, you’ll:
- Disable ruleset: (Default) Ruleset detection is grew to become off.
- Locate and make allowance violations: The violation is detected, and you’ll get data, in line with incident, to your log on the
INFOpoint. - Locate and reject violations: The request is rejected and returns a reaction standing of
HTTP/1.1 400 BAD REQUEST - internet software firewall, and DoS is notified {that a} rule used to be induced. If DoS has been configured for WAF Mistakes, DoS updates its WAF-related counters and takes motion, if essential. If DoS isn’t configured for WAF Mistakes, it ignores the notification it receives from WAF.
Details about the violation could also be despatched to the log, in line with incident, at INFO point. While you hover over the i to the fitting of every rule, the guideline ID vary for that ruleset is displayed. You’ll be able to use this knowledge for checking out rulesets.

b. In Complicated efficiency choices, make a selection probably the most following choices:
- Disable frame scanner: Via default, the request frame is scanned until the frame is greater than 1 MB, by which case the scan is skipped.
Take a look at this feature if request frame scanning isn’t wanted or to cut back CPU intake. - Locate touchy data: If you choose this feature, the request frame is scanned for touchy data, and whilst you practice the WAF coverage to Runtime Cloth, the log abstract (
rtfWafSecurityPolicySummary) information the depend and quantity (rule ID) of the touchy data development this is detected.
c. Click on Save Coverage.
5. Configure the principles to permit or block responses on your internet software:
a. Within the menu at the left, click on Reaction Rulesets.
All of the rulesets are disabled via default. For every rule, you’ll:
- Disable regulations: (Default) Ruleset detection is grew to become off.
- Locate and make allowance violations: The violation is detected, and you’ll get data, in line with incident, to your log on the
INFOpoint. - Locate and reject violations: The request is rejected and returns a reaction standing of
HTTP/1.1 400 BAD REQUEST - internet software firewalland details about the violation could also be despatched to the log at INFO point in line with incident.
b. In Complicated Efficiency Choices, make a selection probably the most following choices:
- Disable frame scanner: Via default, the reaction frame is scanned until the frame is greater than 1 MB, by which case the scan is skipped.
Take a look at this feature if reaction frame scanning isn’t wanted or to cut back CPU intake. - Reaction messages should have probably the most following MIME varieties within the content material sort header or the WAF regulations might not be evaluated:
- textual content/simple
- textual content/html
- textual content/xml
- software/json
- Locate touchy data: If you choose this feature, the reaction frame is scanned for touchy data, and whilst you practice the WAF coverage to Runtime Cloth, the log abstract (
rtfWafSecurityPolicySummary) information the depend and quantity (rule ID) of the touchy data development this is detected.
c. Click on Save Coverage.
6. Escalate the WAF Coverage to DoS:
a. In Safety Insurance policies, make a selection the DoS coverage within the listing and click on Edit.
b. Within the left menu, click on WAF Mistakes.
c. Configure the WAF mistakes and click on Save Coverage.
All WAF mistakes shall be treated via the thresholds you configure within the DoS coverage.
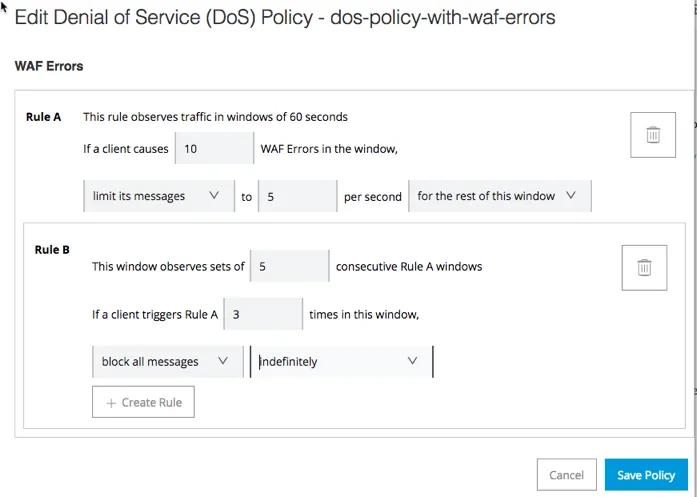
Configuring WAF Mistakes as a part of DoS Coverage
NOTE: For more information. on WAF Rulesets, refer right here.
Tokenization
Tokenization is a extremely efficient manner to offer protection to touchy information. While you tokenize information, touchy information components are substituted with randomly generated non-sensitive information components. It’s usually used for shielding fee card data, individually identifiable data, and different touchy information.
Must haves
- Have the Anypoint Safety — Edge entitlement.
- Have the right kind permissions to regulate tokenization.
- Have Runtime Cloth on VMs/Naked Steel with inbound visitors configured.
A. Create a Tokenization Provider
Steps To Apply
- Cross to the Runtime Supervisor > Tokenization Provider web page.
- Click on Create Tokenization Provider.
- Make a choice the Runtime Cloth to which to deploy the tokenization carrier.
- Make a choice the tokenization layout.
You’ll be able to assign a number of codecs or all codecs to 1 tokenization carrier. - Make a choice the collection of cores to make use of for the tokenization carrier replicas. The tokenization carrier runs on employee nodes in Runtime Cloth. You’ll be able to make a selection a minimal and most collection of cores, outlined as:
- Reserved vCPU: The quantity of vCPU assured and reserved for the appliance’s use.
- vCPU Prohibit: The utmost quantity of vCPU the appliance can use (the extent to which it will possibly burst). It is a shared CPU at the employee node.
6. Make a choice the log point for the tokenization carrier or stay the default (ERROR).
7. Click on Construct and Deploy to create the tokenization desk.
The tokenization mapping desk construct is a one-time motion and takes a while to finish, relying at the dimension of the tokenization layout.
B. Configure a Created Tokenization Provider
There are two techniques to take action:
- Observe a Tokenization coverage to the API Gateway: You’ll be able to practice a tokenization coverage to configure the API gateway capacity of Mule 4 to tokenize or detokenize request and reaction information despatched between the Anypoint Runtime Cloth inbound load balancer and the Mule app.
- Disclose Tokenization as a carrier to Mule apps: When additional information processing is needed, a Mule software can upload enterprise good judgment to ship tokenization and detokenization requests without delay to the tokenization carrier as a part of its processing.
NOTE: For more information. on tokenization codecs, refer right here.
Secrets and techniques Supervisor
Anypoint Safety’s Secrets and techniques Supervisor makes use of safe vault generation to shop and keep an eye on get entry to to personal keys, passwords, certificate, and different secrets and techniques.
Secrets and techniques Supervisor isn’t a general-purpose software, it best helps utilization with Anypoint Runtime Cloth and API Supervisor Proxy’s (for HTTPS certificates garage).
Secrets and techniques Supervisor helps Control of TLS context for:
- Runtime Cloth Ingress: You’ll be able to shop TLS artifacts within the secrets and techniques supervisor after which configure Runtime Cloth Ingress with the name of the game reference. Secrets and techniques Supervisor helps Runtime Cloth Ingress just for RTF on VMs /Naked Steel (Equipment) merchandise.
- API Supervisor: You’ll be able to shop the TLS artifacts within the secrets and techniques supervisor after which configure API Supervisor with the name of the game reference.
Secrets and techniques Supervisor can shop and organize those secret varieties:
- TLS Context: SSL Safety Parameters (ciphers to make use of, TLS model, and so forth).
- Keystore: A repository of safety certificate (both authorization certificate or public key certificate), at the side of their corresponding personal keys.
- Truststore: A repository of safety certificate from both different events with which you are expecting to keep in touch or Certificates Government that you simply have confidence to spot different events.
- Certificate: Public X.509 certificate, which might be digital paperwork that bind a public key with an identification (hostname, group, or particular person).
- Certificates Pin Set: A repository of safety certificate from different events that affiliate a consumer or host with their anticipated X.509 certificates or public key.
- CRL Distributor: An entity that creates and maintains a listing of CA certificate which are now not depended on as a result of their related personal keys, or a signing CA, have been compromised.
NOTE: For more information. on Secret Varieties, refer right here.
Secret Teams
A Secret Staff is a logical grouping of secrets and techniques that lets you organize a bunch of secrets and techniques as a unit.
Secrets and techniques Supervisor shops your secrets and techniques in line with secret organization, in line with setting, and in line with enterprise organization.
A. Create a Secret Staff
Steps To Apply
- In Anypoint Platform, cross to Control Heart, then make a selection Secrets and techniques Supervisor.
- Click on Create Secret Staff.
- Input a reputation for the name of the game organization and click on Save. The title of your secret organization should:
- Get started with a letter
- Be no less than 3 characters lengthy and now not than 35 characters
- Comprises best letters, numbers, and dashes; on the other hand, the title can’t finish with a splash.
After developing your secret organization, apparently within the Secret Teams listing view. Edit the name of the game organization so as to add the essential secret varieties, akin to a truststore or a keystore.
B. Upload a Truststore Right into a Created Secret Staff
For the stairs to observe, refer right here.
C. Upload a Keystore Right into a Created Secret Staff
For the stairs to observe, refer right here.
D. Upload a Certificates Pinset Right into a Created Secret Staff
For the stairs to observe, refer right here.
E. Upload a Shared Secret Right into a Created Secret Staff
For the stairs to observe, refer right here.
F. Upload a Certificates
Steps To Apply
- Within the Secret Teams listing view, make a selection the name of the game organization you want so as to add a certificates to and click on Edit.
- Within the menu at the left, make a selection Certificates after which click on Upload Certificates.
- Within the Upload Certificates display screen, entire those fields:
- Title: Input a reputation to your certificates.
- Kind: Make a choice PEM from the drop-down menu.
- Certificates Document: Click on Make a selection Document and make a selection the certificates document to add.
- Override Expiration Date: If you wish to override the present expiration date of the certificates, make a selection a brand new expiration date.
4. Click on Save.
G. Upload a TLS Context for Mule
Steps To Apply
- Within the Secret Teams listing view, make a selection the name of the game organization to which so as to add a TLS context.
- Make a choice TLS Context within the menu at the left, and click on Upload TLS Context.
- Within the Create TLS Context display screen, upload the specified data:
- Title: Input a reputation to your TLS context.
- Goal: Make a choice Mule to make use of the TLS context because the SSL validation for Mule 4-based API proxies. Makes use of the TLS context because the SSL validation for Mule 4-based API proxies.
- TLS Model: Via default, TLS 1.2 is chosen. You’ll be able to make a selection TLS 1.1 to enhance each variations.
- Keystore: From the drop-down listing, make a selection the keystore to shop the TLS context.
- Truststore: Optionally make a selection a truststore to which so as to add the TLS context in case you are the usage of a truststore to shop certificate depended on via the shopper.
If the Goal price for the TLS context is Mule, you’ll make a selection Insecure for those who don’t need certificates validation enforced. - Expiration Date: Optionally make a selection the expiration date for the certificates.
4. Optionally make a selection ciphers for the TLS context. For more information. on ciphers, refer right here.
5. Click on Save.
H. Upload a TLS Context for Anypoint Runtime Cloth
For the stairs to observe, refer right here.
NOTE: For information. on easy methods to allow Jstomer authentication for TLS context, refer right here.
In Networking Layer
5. VPC Setup
The Anypoint Digital Personal Cloud (VPC) providing lets you create a digital, personal, and remoted community section within the cloud to host your CloudHub employees.
A. Provision a VPC
Steps To Apply
- Create the VPC: It is a self-service task. You’ll be able to create a VPC the usage of both the Runtime Supervisor UI, or the Anypoint Platform CLI.
- Attach on your Anypoint VPC: Configure your Anypoint VPN or transit gateway to attach the Anypoint VPC on your on-premises community.
B. Create the Anypoint VPC
Must haves
- Anypoint VPC entitlement.
- Permission to create and administrate an Anypoint VPC.
Steps To Apply
- Check in on your Anypoint Platform account as a person with the Group Administrator function.
- Underneath Control Heart, click on Runtime Supervisor.
- Within the left navigation, click on VPCs.
- Click on Create VPC, and input the next data to outline and configure the Anypoint VPC:
- Title: The title to spot your Anypoint VPC. The title should:
- Be distinctive throughout the group.
- Between 3–42 characters lengthy.
- Include best lowercase letters, numbers, and dashes.
- Area: The area to which the Anypoint VPC is certain.
- CIDR Block: The scale of the Anypoint VPC in Classless Inter-Area Routing (CIDR) notation.
- Environments: Optionally, make a selection an atmosphere to which to bind Anypoint VPC. Should you don’t make a selection an atmosphere, all packages deployed to the chosen area are related to this Anypoint VPC.
- Set as default VPC: Make a choice this method to set the Anypoint VPC because the default for the area you place. Which means that all environments on this area no longer related to an Anypoint VPC shall be, via default, related to this Anypoint VPC.
- Industry Teams: Optionally, bind the Anypoint VPC with a enterprise organization.
Should you don’t make a selection a enterprise organization, the Anypoint VPC is related to the principle group.
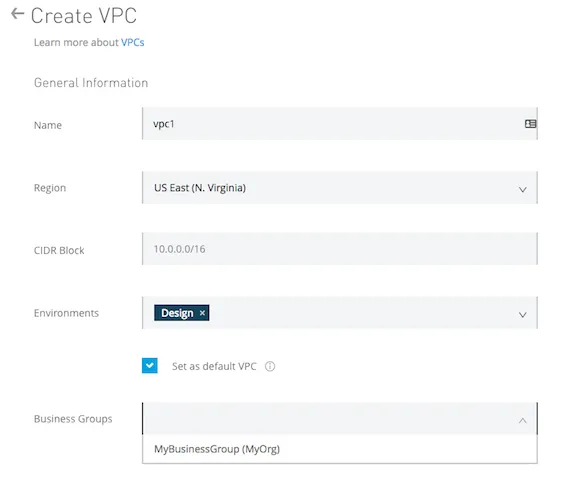
Coming into Normal Data whilst making a VPC
5. Click on Firewall Laws to amplify the fields and configure firewall regulations. Via default, all inbound visitors is blocked, and you want to configure firewall regulations to permit visitors on your employee. You’ll be able to configure those regulations later.
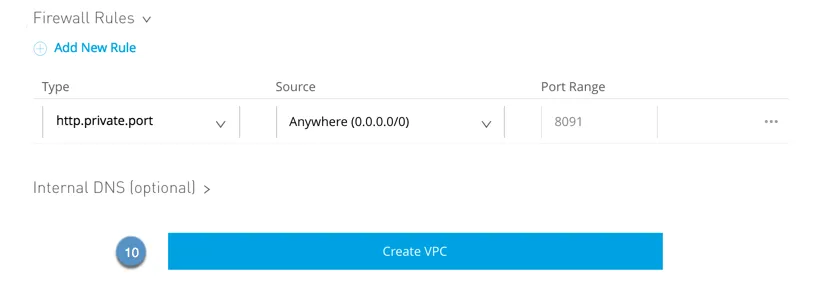
Configuring Firewall Laws whilst making a VPC
NOTE: For more information. on Firewall Laws, refer right here.
6. Optionally, you’ll click on the Interior DNS method to arrange inside DNS servers to unravel your personal host names. You’ll be able to do that whilst you to start with create the Anypoint VPC, or you’ll configure the inner DNS later.
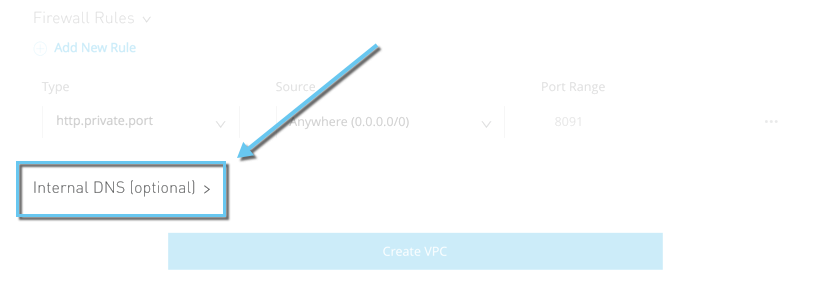 Method to setup Intenal DNS whilst making a VPC
NOTE: For information. on easy methods to setup inside DNS, refer right here.
C. Replace an Present Anypoint VPC
For the stairs to observe, refer right here.
D. Hook up with Your Anypoint VPC
The method for soliciting for or updating Anypoint VPC connectivity on your community is determined by the connectivity approach you utilize: IPsec, Transit Gateway attachments, VPC Peering, or AWS Direct Attach.
NOTE: For the stairs to observe on easy methods to configure any of the above connectivity strategies, refer right here.
In Packages Layer
6. Design Issues
MuleSoft packages leverage the RAML and OAS Specs within the code for enter validation and to reject flawed endpoints. When updates are wanted, the specification must be up to date and imported again into the appliance. This offers the protection staff a view into the overall API specification, permitting them to make suitable choices in regards to the design and possible insurance policies that want to be implemented.
A. Upload Element to the RAML Enter That Will Assist Give protection to Your API
The RAML Specification will have as a lot or as little element as wanted. Extra element complements the validation of the inbound content material, which would possibly scale back the volume of coding wanted within the implementation. The next RAML snippet, as an example, highlights the extent of element between two other enter parameters:
get:
  queryParameters:
    firstParameter: string
    secondParameter:
      sort: string
      development: ^[A-Za-z]{1}[A-Za-z ]{1,49}$
The primary parameter takes any string at any duration, which is liable to injection assaults, however the second one parameter best accepts mixed-case alphabetic strings and areas which are from 2 to 50 characters lengthy. The better element on the second one parameter guards towards injection assaults and provides each the shopper and the developer a greater concept of the predicted enter.
B. Upload Element to the Specification When Safety Insurance policies Are Mentioned
characteristics:
  client-id-required:
    headers:
      client_id: string
      client_secret: string

/workers:
  get:
    is: [client-id-required]
If insurance policies are thought to be at design time, further necessities can also be added to the RAML specification. Now not best does this assist the builders perceive the API for coding, but it surely additionally is helping possible shoppers perceive what is needed for adoption.
C. Decide Suitable Goal SLAs and Software Load at the API
- Simply as vital as enterprise necessities, non-functional necessities (like top load quantity, desired reaction time, and applicable downtime) assist form the design and structure of an API. Those necessities additionally assist with safety as a result of they power what efficiency insurance policies and signals shall be wanted to offer protection to the API and tell groups of possible assaults.
- Some other vital explanation why to have predefined SLAs is to grasp the affects of downstream methods. As an example, if an API that communicates with an ERP is attacked, the assault would possibly interrupt get entry to to the ERP for all customers. If the API used to be secure with rate-limiting or spike keep an eye on insurance policies, the assault would no longer prolong to the ERP machine.
D. Perceive API-Led Connectivity and Make a decision How Every Layer Must Be Secure
API-led way no longer best can boost up the advance of long run initiatives but in addition protects the group from possible adjustments to the back-end methods. The 3 layers (Enjoy, Procedure, and Gadget) all have other functions, which additionally ends up in other safety concerns.
7. Safe Community Communications — Shipping Layer Safety (TLS)
Shipping Layer Safety (TLS) is a cryptographic protocol that secures communications in Mule packages. Mule supplies out-of-the-box enhance for HTTPS (HTTP Safe).
One-Manner TLS (Elementary Authentication)
In a technique TLS server gifts a certificates to the shopper, however the Jstomer isn’t required to give a certificates to the server. The customer should authenticate the server, however the server will settle for any Jstomer into the relationship.
Two-Manner TLS (Mutual Authentication)
In two-way TLS, each the shopper and server have to give a certificates prior to the relationship is established between the 2. With two-way TLS authentication, the Server no longer best authenticates itself to the shopper but in addition calls for authentication from the soliciting for Jstomer. Shoppers are required to publish virtual certificate issued via a depended on CA.
KeyStore
A KeyStore shops public certificate plus corresponding personal keys (credential) for shoppers or servers in a Mule software:
- Public certificate in a keystore have a certificates chain related to them, which authenticates the corresponding public key.
- In TLS, the keystore determines the credentials (public certificates) despatched to the far flung host (e.g., Jstomer).
TrustStore
The TrustStore accommodates public certificate (self-signed or from a CA) for far flung hosts (different events) and possibly additionally the signing CAs:
- The keystore proprietor trusts the general public certificate (and the contained public keys) contained in its truststore to spot different events.
- In TLS, the truststore determines whether or not credentials (public certificate) despatched via the far flung host (the shopper) are depended on and therefore if the safe connection can also be established.
Connectors that enhance TLS connections
- HTTP/S Shopper and Server
- SFTP Shopper
- SMTP/S Shopper
- TCP Sockets Shopper and Server
- JMS Shopper
The JMS same old does no longer specify TLS connections. The JMS service should enhance TLS and supply a TLS connection manufacturing facility in its Jstomer library.
A. Configure TLS
To allow TLS for Mule apps, configure the tls:context component within the Mule XML configuration document in one in every of 3 ways:
i. Edit the XML document without delay.
ii. Use Anypoint Studio 7.
iii. Use the Design Heart glide clothier.
i. Edit the XML document without delay
Steps To Apply
- Globally, defining a TLS Part — can be utilized from each the shopper and server facets.
- Come with no less than probably the most nested components: key-store and trust-store.
- Configure not obligatory attributes of the
tls-contextPart, if required:
enabledProtocols: The protocols within the world TLS configuration.enabledCipherSuites: The cipher suites in world TLS configuration.
Those values are used if there’s not anything specified within the world TLS configuration or if the values are enabled in an international TLS configuration.
4. Configure attributes of the trust-store Part:
trail: The trail to the document that accommodates the have confidence shop.sort: The kind of the have confidence shop. Default = JKS.password: The have confidence shop password (required for those who specifytrail).set of rules: The set of rules the have confidence shop makes use of. Default isSunX509.insecure: Boolean that determines whether or not or to not validate the truststore. If set totrue, no validation happens. The default price isfalse.
The password characteristic is needed for those who specify a trail. In a different way, the attributes are not obligatory.
5. Configure attributes of the key-store Part:
trail: The trail to the document that accommodates the keystore (required).sort: The kind of the keystore (default JKS).password: The keystore password.keyPassword: The important thing supervisor password, which is the password for the non-public key within the keystore.set of rules: The set of rules used within the keystore. The default price isSunX509.
ii. Use Anypoint Studio (to configure in HTTP Listener)
Steps To Apply
- Open Anypoint Studio.
- Open the mission.
- Open HTTP Listener.
- Within the Normal tab, make a selection an present configuration or create a brand new one.
- Within the HTTP Listener config conversation, make a selection the TLS tab.
- Within the TLS tab, select the TLS Configuration, sort Edit Inline, and provide the values.
- Optionally, fill within the Enabled Protocols and Enabled Cipher Suites fields within the Complicated part. For more information., refer right here.
- Save your configuration.
NOTE: Identical steps can also be adopted for different connectors indexed above.

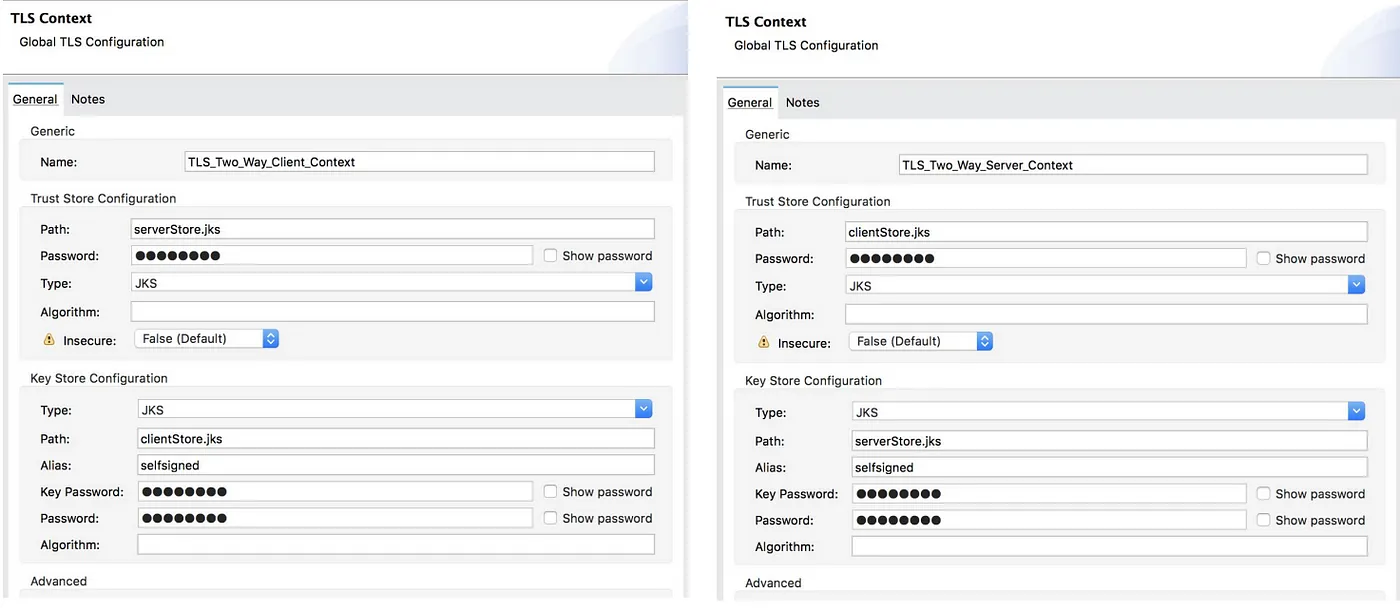
Configuring two-way TLS for HTTPS
iii. Use Design Heart (to configure in HTTP Listener)
Steps To Apply
- Log into Design Heart.
- Open the mission.
- Open HTTP Listener.
- Within the Configuration tab, click on Edit.
- Within the TLS tab, fill within the TLS Configuration fields.
- Optionally, fill within the Enabled Protocols and Enabled Cipher Suites fields. For more information., refer right here.
- Save your configuration.
NOTE: Identical steps can also be adopted to configure in different connectors indexed above.
B. Externalize Safety Certificate (Appropriate Just for Buyer-Hosted Runtimes)
There are two techniques to do that:
i. Transfer certificate to a folder out of doors MULE_HOME:
a. Upload a certificates folder within the classpath within the wrapper.conf document in <MULE_HOME>/conf: wrapper.java.classpath.3=%CERT_DIREFCTORY%
b. Safe %CERT_DIRECTORY% the usage of working machine permissions.
OR
ii. Use Secrets and techniques Supervisor to shop certificate: That is acceptable ONLY for
- Buyer-hosted Mule runtimes in Runtime Cloth (RTF).
- API Supervisor (with an HTTPS-secured API proxy).
8. Cryptography
Cryptography is the observe and learn about of ways for safe communique within the presence of 3rd events.
The Cryptography Module helps 3 other methods to encrypt and signal messages:
- PGP: Signature/encryption the usage of PGP.
- XML: For signing or encrypting XML paperwork or components.
- JCE: For the usage of a much wider vary of cryptography features as supplied via the Java Cryptography Extension (JCE).
The Cryptography module additionally supplies operations to calculate and validate a checksum to test information for mistakes. Those operations are impartial of the encryption technique used.
A. Use PGP Cryptography
Beautiful Just right Privateness (PGP) is incessantly used for signing, encrypting, and decrypting texts, emails, information, and directories to extend the protection of communications.
Public and Personal keys are vital in PGP to encrypt and decrypt the information. The general public secret’s used to encrypt information and percentage it with end-users. The Personal secret’s used to decrypt the encrypted information.
Steps To Apply
- Generate keys — Public and Personal keys.
- Export keys.
- Determine fingerprints for the generated keys.
- Configure Encryption/Decryption.
Generate Keys: Steps to Apply
- Use any software (Git Bash) that helps era of PGP Public/Personal keys and run this command: gpg — gen-key
- Input main points akin to desired key dimension, key validity, and so on. Press Input to specify the default variety.
- Input your person data, akin to your Actual title and electronic mail deal with.
- Kind a safe Passphrase.
Export Generated Public Key: Steps To Apply
- Run this command to listing GPG keys for which you may have each a private and non-private key:
gpg - list-secret-keys - keyid-format LONG
2. Run this command to export the generated public key to the specified location to provide a corresponding key ring document:
gpg –output <<Folder_Path>><<Public_Key_Name>>.gpg –export <<Email_Address>>
WHERE
- <<Folder_Path>>: Listing/Folder to shop the general public key document.
- <<Email_Address>>: E-mail given throughout era.
- <<Public_Key_Name>>: Title for the general public key.
Export Generated Personal Key: Steps To Apply
- Run this command to listing GPG keys for which you may have each a private and non-private key:
gpg - list-secret-keys - keyid-format LONG
2. Run this command to export the generated personal key to the specified location to provide a corresponding key ring document:
gpg –export-secret-keys <<Key_Value>> > <<Folder_Path>><<Private_Key_Name>>.gpg
WHERE
- <<Key_Value>>: The worth of the important thing.
- <<Folder_Path>>: Listing/Folder to shop the general public key document.
- <<Private_Key_Name>>: Title for the non-public key.
Determine Fingerprints for the Generated Keys: Steps To Apply
- Run this command to listing GPG keys for which you may have each a private and non-private key:
gpg - list-secret-keys - keyid-format LONG
2. Notice down the closing 16 digits of the row “sec,” which is the fingerprint of the important thing.

Configure Encryption/Decryption in Anypoint Studio
Steps To Apply
- From the Mule palette, upload Crypto on your mission.
- Make a choice the specified operation and drag the part to the glide.
- Open the part houses and make a selection an present Module configuration, or create a brand new one via specifying the Public keyring document and the Personal keyring document.
- Configure Key variety via the usage of a key ID price up to now outlined within the module configuration or outline a brand new one for the chosen operation.
- Make a choice the set of rules to make use of throughout the operation.
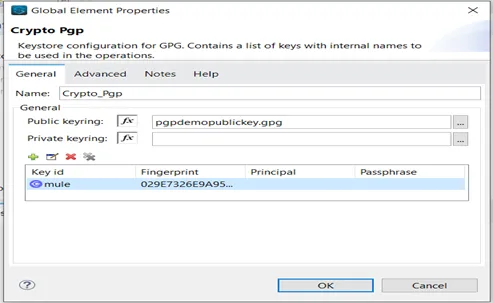
Keystore Configuration
NOTE: For more information. on configuration, refer right here.
B. Use XML Cryptography
XML Cryptography supplies encryption/decryption of a component inside of an XML file.
Key Issues
- It is composed of elementPath, which is an XPath expression that identifies the component to encrypt.
- It makes use of JCE Configuration.
- Relying for your wishes, you’ll use a symmetric or uneven key for encrypting an XML file.
- It’s used just for XML file encryption.
Steps To Apply
- Generate keystore: XML Encryption/Decryption uses a keystore. Keystore can also be in JCEKS, JKS, PKCS12 codecs. Use the beneath command (pattern) to generate the keystore in JCEKS layout:
keytool -genseckey -alias pattern -keyalg AES -keystore pattern.jceks -keysize 128 -storeType JCEKS
2. Configure Encryption/Decryption in Anypoint Studio:
a. From the Mule palette, upload Crypto on your mission.
b. Make a choice the specified operation (encrypt, decrypt, signal, validate), and drag the part to the glide.
c. Open the part houses and make a selection an present Module configuration, or create a brand new one via specifying the Keystore, Kind (JKS, JCEKS, PKCS12), and Password. You’ll be able to additionally upload symmetric or uneven key data for use within the signal operations.
d. Configure Key variety via the usage of a key ID price up to now outlined within the module configuration or outline a brand new one for the chosen operation.
e. Make a choice Digest Set of rules, Canonicalization Set of rules, Kind, and Part trail.
NOTE: For more information. on configuration, refer right here.
C. Use JCE Cryptography
The JCE Cryptography lets you use the broader vary of cryptography features supplied via the Java Cryptography Extension (JCE).
You’ll be able to use cryptography features in two techniques:
- Password-based encryption (PBE): This system lets you encrypt and signal content material via offering best an encryption password.
- Key-based encryption: Like how PGP and XML encryption paintings, this technique lets you configure a symmetric or uneven key to accomplish encryption and signing operations.
Steps To Apply
- Generate Keystore: Encryption and Decryption employ a Keystore that mixes a key with a certificates. Keystore can also be in JCEKS, JKS, and PKCS12 codecs. Use the beneath command (pattern) to generate the Keystore in JCEKS layout:
keytool -genkey -alias pattern -keyalg RSA -keystore pattern.jceks -storepass 123456 -keypass PrivateKeyPwd -dname "CN=root OU=Construction, O=org, L=Pune, S=Maharashtra, C=INDIA" -storetype JCEKS -keysize 1024
2. Configure Encryption/Decryption — Password-based or Key-based.
PBE: This system applies a hash serve as over the supplied password to generate a symmetric key this is appropriate with same old encryption algorithms.
As a result of PBE best calls for a password, an international configuration component isn’t wanted for the PBE operations.
Configure PBE in Anypoint Studio: Steps to Apply
- From the Mule palette, upload Crypto on your mission.
- Make a choice the specified operation and drag the part to the glide.
- Within the part view, configure the Set of rules and Password houses.
Configure Key-Based totally Encryption in Anypoint Studio: Steps to Apply
- From the Mule palette, upload Crypto on your mission.
- Make a choice the specified operation and drag the part to the glide.
- Open the part houses and make a selection an present module configuration, or create a brand new one via specifying values for Keystore, Kind (JKS, JCEKS, PKCS12), and Password. You’ll be able to additionally upload symmetric or uneven key data for use within the signal operations.
- Configure Key variety via the usage of a Key identification price up to now outlined within the module configuration or outline a brand new one for this operation.
- Make a choice the set of rules to make use of throughout the operation.
NOTE: For more information. on configuration, refer right here.
D. Use Crypto Module (dw::Crypto) in Dataweave
DataWeave additionally has a Crypto module for hashing payload. This module supplies purposes that carry out encryptions via commonplace algorithms, akin to MD5, SHA1, and so forth. To make use of this module, you should import it on your DataWeave code via including the road import * from dw::Crypto to the header of your DataWeave script.
NOTE: For information on more than a few purposes to be had, refer right here.
9. Enter Sanitization/Validation
SQL Injection Prevention
A. Upload API Insurance policies
Upload API Insurance policies akin to JSON and XML Risk Coverage for the APIs uncovered out of doors the community (Enjoy API). For more information., see above below the part ‘API Gateway — API Control’
B. Upload Safety Components in RAML
Safe your API via including DataTypes and Securities in RAML Definition.
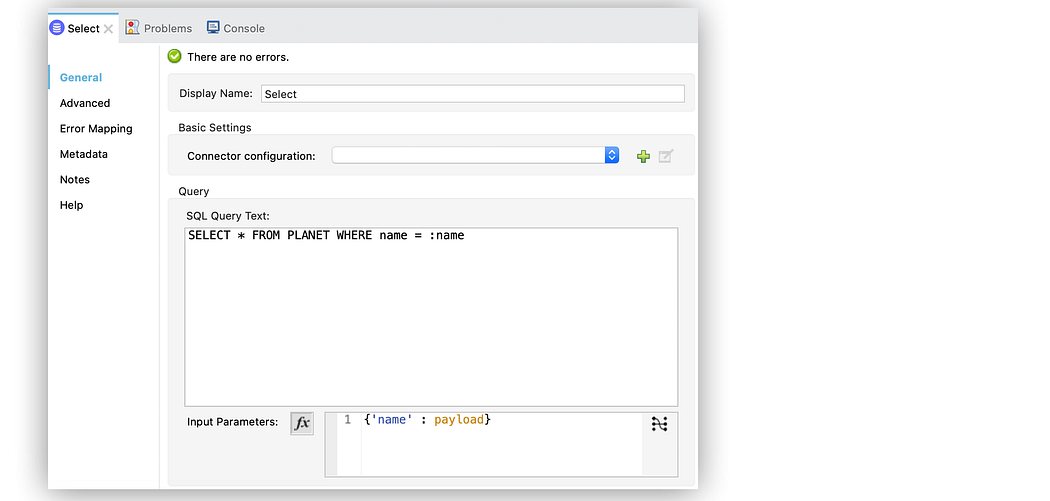
C. Use Parameterized SQL Queries in API Implementation
To give protection to database queries, configure the Enter parameters box within the Make a choice operation via including variable values to the SQL commentary you execute within the database.
Use enter parameters to configure the WHERE clause in a SQL SELECT commentary to make the question resistant to SQL Injection assaults, see beneath (as an example):
XSS (Go-Web page Scripting) Prevention
A. Prohibit the Information That Can Be Authorized
Design your API via specifying the sort and layout of information this is applicable. Maximum assault occurs when coping with HTML information, and proscribing what to just accept is important. You’ll be able to specify what to just accept within the RAML Definition.
B. Deny All Untrusted Information
Best permit depended on events to make requests to the API. You’ll be able to select one safety coverage from the out-of-the-box insurance policies (For more information., see above below the part ‘API Gateway — API Control’) that matches the use case.
C. Sanitize and Prohibit the Authorized Information
When dealing with information from shoppers, it’s crucial to make sure all information is escaped correctly and in suitable shape. This doesn’t best save you XSS but in addition different kinds of assaults. For instance, you’ll practice a JSON Risk Coverage Coverage to restrict the form of permitted JSON to keep away from denial of carrier assaults.
D. Prepare a Safety Evaluation
Relying at the permitted information and the way the information is treated (i.e., remodeled, saved, and introduced to shoppers), the XSS flaws can also be tough to spot and take away from a internet software. It is recommended to accomplish a safety evaluate and take a look at all enter from the shopper that might be able to turn into part of the HTML output this is introduced to the shopper.
In Information Layer
10. Software Homes Configuration
You’ll be able to encrypt configuration houses as every other safety point to your packages. We want to encrypt the information inside of any assets information to limit unauthorized get entry to and give protection to touchy information.
Steps To Apply
- Create a safe configuration houses document.
- Outline safe houses within the document. There are three ways to do that:
- Use Mule Homes Editor
- Use the Safe Homes Software
- Use Safe Homes Generator
- Configure the document within the mission with the Mule Safe Configuration Homes Extension module. The document should level to or come with the decryption key.
A. Use Mule Homes Editor
Steps To Apply
- Set up the Mule houses editor into Anypoint Studio via following those steps:
- Open Set up New Instrument from the Assist menu.
- Click on the Upload button, and it’s going to open a window. Supply your Title as Anypoint Undertaking Safety, supply your location, and press the Upload button.
- Cross to the Paintings with drop-down and Make a choice Anypoint Undertaking Safety.
- Make a choice the Top rate checkbox after which click on Subsequent.
- Settle for the coverage after which click on End.
2. Cross on your <Challenge Folder>/src/primary/assets/<your config document>, right-click, cross to Open with > Mule Homes Editor, after which click on on it.
3. If you don’t see the Mule Homes Editor, right-click for your configuration document and cross to Open with > different.
4. Seek for Mule Homes Editor, you’ll see it if Anypoint Undertaking Safety is put in accurately.
5. Double-click at the assets title you wish to have to encrypt, and a window will pop up; click on Encrypt after which OK.
6. Make a selection the Set of rules of your selection and input the safe Key approved via your company.
7. An encrypted configuration assets is in a position for use. Click on OK, and the worth is robotically changed with the brand new encrypted price.
B. Use the Safe Homes Software
Steps To Apply
- Obtain the software jar document the usage of this hyperlink.
- Now open the command urged and navigate to the site of the software.
- To encrypt the values, use the next syntax:
java -cp secure-properties-tool.jar com.mulesoft.equipment.SecurePropertiesTool
<approach>
<operation>
<set of rules>
<mode>
<key>
<price>
 - use-random-iv [optional]
4. Set <approach> to string to configure the software to task a textual content string.
5. Specify the opposite parameters to accomplish your required operation.
Pattern:
java -cp secure-properties-tool.jar com.mulesoft.equipment.SecurePropertiesTool
string
encrypt
Blowfish
CBC
mulesoft
"some price to encrypt"
NOTE: You’ll be able to encrypt or decrypt the values inside of a houses document or the entire document’s content material. For more information, refer right here.
C. Use Safe Homes Generator
That is the very best and fastest approach to encrypt your houses. This lets you do the very same factor however on-line, with out writing instructions and downloading tool supplied via MuleSoft + Salesforce, the place you’ll encrypt no longer best string values however entire information as smartly.
Steps To Apply
- Navigate right here and fill in the main points.
- Make a selection the Operation, Set of rules, and State from the drop-down. Input your Key and Price to be encrypted/decrypted. Click on on Generate, and your encrypted secret’s in a position.
Conclusion
That is an try to collate excellent practices to construct extremely safe Mule packages in a single position. Mule builders enthusiastic about construction extremely safe packages can seek advice from this text.
Thanks for studying! Hope you to find this text useful in no matter manner imaginable. Please don’t overlook to love and percentage and be happy to percentage your ideas within the feedback part.
If you have an interest, please undergo my earlier blogs:
MuleSoft: Anypoint Mule Gateway vs. Anypoint Flex Gateway vs. Anypoint Provider Mesh
Highest Practices To Create Top To be had (HA) Packages in Mule 4
Highest Practices for Developing Extremely Dependable Packages in Mule 4
Highest Practices to Create Top-Performant Packages in Mule 4