Final 12 months, I wrote a publish on OpenTelemetry Tracing to grasp extra concerning the matter. I additionally created a demo round it, which featured the next elements:
- The Apache APISIX API Gateway
- A Kotlin/Spring Boot provider
- A Python/Flask provider
- And a Rust/Axum provider
I have not too long ago stepped forward the demo to deepen my working out and need to percentage my studying.
The use of a Common Database
Within the preliminary demo, I did not trouble with a typical database. As a substitute:
- The Kotlin provider used the embedded Java H2 database
- The Python provider used the embedded SQLite
- The Rust provider used hard-coded knowledge in a hash map
I changed they all with a typical PostgreSQL database, with a devoted schema for every.
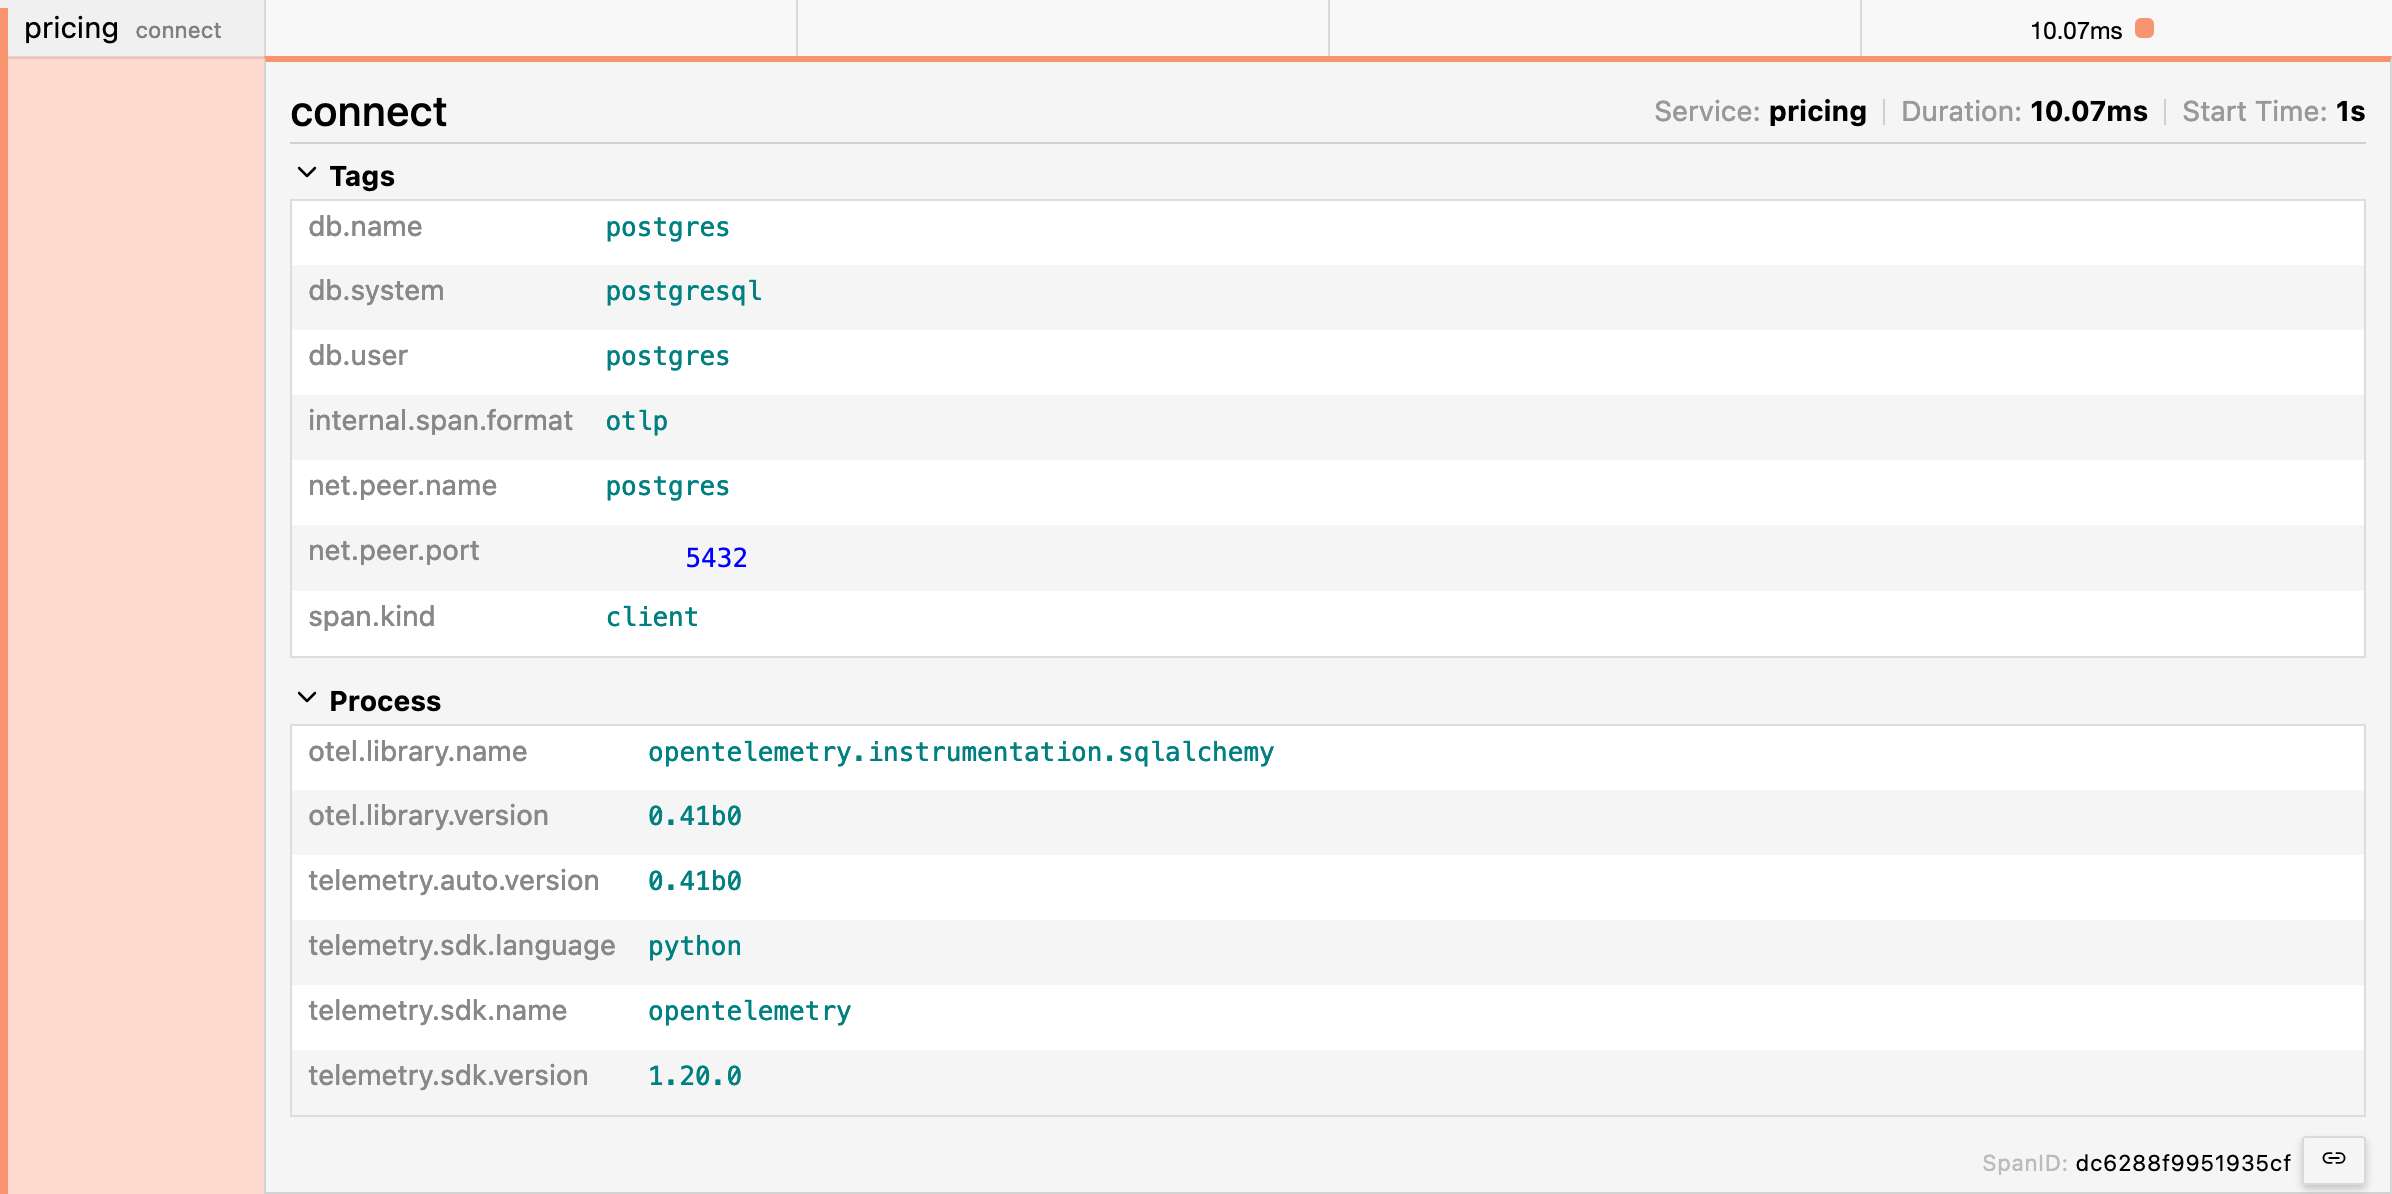
The OpenTelemetry agent added a brand new span when connecting to the database at the JVM and in Python. For the JVM, it is computerized when one makes use of the Java agent. One wishes to put in the related package deal in Python — see subsequent segment.
OpenTelemetry Integrations in Python Libraries
Python calls for you to explicitly upload the package deal that tools a selected library for OpenTelemetry. As an example, the demo makes use of Flask; therefore, we must upload the Flask integration package deal. Then again, it may possibly turn into a lovely tedious procedure.
But, as soon as you will have put in opentelemetry-distro, you’ll be able to “sniff” put in applications and set up the related integration.
pip set up opentelemetry-distro

opentelemetry-bootstrap -a set up
For the demo, it installs the next:
opentelemetry_instrumentation-0.41b0.dist-info
opentelemetry_instrumentation_aws_lambda-0.41b0.dist-info
opentelemetry_instrumentation_dbapi-0.41b0.dist-info
opentelemetry_instrumentation_flask-0.41b0.dist-info
opentelemetry_instrumentation_grpc-0.41b0.dist-info
opentelemetry_instrumentation_jinja2-0.41b0.dist-info
opentelemetry_instrumentation_logging-0.41b0.dist-info
opentelemetry_instrumentation_requests-0.41b0.dist-info
opentelemetry_instrumentation_sqlalchemy-0.41b0.dist-info
opentelemetry_instrumentation_sqlite3-0.41b0.dist-info
opentelemetry_instrumentation_urllib-0.41b0.dist-info
opentelemetry_instrumentation_urllib3-0.41b0.dist-info
opentelemetry_instrumentation_wsgi-0.41b0.dist-info
The above setup provides a brand new automatic hint for connections.
Gunicorn on Flask
Each and every time I began the Flask provider, it confirmed a caution in purple that it should not be utilized in manufacturing. Whilst it is unrelated to OpenTelemetry, and despite the fact that no person complained, I used to be now not too keen on it. Because of this, I added a “actual” HTTP server. I selected Gunicorn, for no different explanation why than as a result of my wisdom of the Python ecosystem continues to be shallow.
The server is a runtime worry. We simplest wish to trade the Dockerfile fairly:
RUN pip set up gunicorn

ENTRYPOINT ["opentelemetry-instrument", "gunicorn", "-b", "0.0.0.0", "-w", "4", "app:app"]- The
-bchoice refers to binding; you’ll be able to connect to a selected IP. Since I am operating Docker, I do not know the IP, so I bind to any. - The
-wchoice specifies the selection of employees - In any case, the
app:appargument units the module and the applying, separated by means of a colon
Gunicorn utilization does not have an effect on OpenTelemetry integrations.
Heredocs for the Win
It’s possible you’ll take pleasure in this should you write numerous Dockerfile.
Each and every Docker layer has a garage value. Therefore, within a Dockerfile, one has a tendency to keep away from useless layers. As an example, the 2 following snippets yield the similar effects.
RUN pip set up pip-tools
RUN pip-compile
RUN pip set up -r necessities.txt
RUN pip set up gunicorn
RUN opentelemetry-bootstrap -a set up

RUN pip set up pip-tools
  && pip-compile
  && pip set up -r necessities.txt
  && pip set up gunicorn
  && opentelemetry-bootstrap -a set up
The primary snippet creates 5 layers, whilst the second one is just one; alternatively, the primary is extra readable than the second one. With heredocs, we will get right of entry to a extra readable syntax that creates a unmarried layer:
RUN <<EOF

  pip set up pip-tools
  pip-compile
  pip set up -r necessities.txt
  pip set up gunicorn
  opentelemetry-bootstrap -a set up

EOF
Heredocs are an effective way to have extra readable and extra optimized Dockerfiles. Check out them!
Specific API Name at the JVM
Within the preliminary demo, I confirmed two approaches:
- The primary makes use of auto-instrumentation, which calls for no further motion
- The second one makes use of handbook instrumentation with Spring annotations
I sought after to demo an specific name with the API within the stepped forward model. The use-case is analytics and makes use of a message queue: I am getting the hint knowledge from the HTTP name and create a message with such knowledge so the subscriber can use it as a dad or mum.
First, we wish to upload the OpenTelemetry API dependency to the mission. We inherit the model from the Spring Boot Starter dad or mum POM:
<dependency>
    <groupId>io.opentelemetry</groupId>
    <artifactId>opentelemetry-api</artifactId>
</dependency>
At this level, we will get right of entry to the API. OpenTelemetry gives a static way to get an example:
val otel = GlobalOpenTelemetry.get()At runtime, the agent will paintings its magic to go back the example. Here is a simplified magnificence diagram curious about tracing:

In flip, the float is going one thing like this:
val otel = GlobalOpenTelemetry.get()                                   //1
val tracer = otel.tracerBuilder("ch.frankel.catalog").construct()          //2
val span = tracer.spanBuilder("AnalyticsFilter.clear out")                //3
                 .setParent(Context.present())                         //4
                 .startSpan()                                          //5
// Do one thing right here
span.finish() //6- Get the underlying
OpenTelemetry - Get the tracer builder and “construct” the tracer
- Get the span builder
- Upload the span to the entire chain
- Get started the span
- Finish the span; after this step, ship the information to the OpenTelemetry endpoint configured
Including a Message Queue
After I did the debate in response to the publish, attendees steadily requested whether or not OpenTelemetry would paintings with messages similar to MQ or Kafka. Whilst I believed it was once the case in idea, I sought after to verify of it: I added a message queue within the demo beneath the pretense of analytics.
The Kotlin provider will submit a message to an MQTT subject on every request. A NodeJS provider will subscribe to the subject.
Attaching OpenTelemetry Information to the Message
Up to now, OpenTelemetry mechanically reads the context to determine the hint ID and the dad or mum span ID. Regardless of the way, auto-instrumentation or handbook, annotations-based or specific, the library looks after it. I did not in finding any current equivalent automation for messaging; we wish to code our manner in. The gist of OpenTelemetry is the traceparent HTTP header. We wish to learn it and ship it together with the message.
First, let’s upload MQTT API to the mission.
<dependency>
    <groupId>org.eclipse.paho</groupId>
    <artifactId>org.eclipse.paho.mqttv5.shopper</artifactId>
    <model>1.2.5</model>
</dependency>
Curiously sufficient, the API does not permit get right of entry to to the traceparent immediately. Then again, we will reconstruct it by way of the SpanContext magnificence.
I am the usage of MQTT v5 for my message dealer. Be aware that the v5 permits for metadata hooked up to the message; when the usage of v3, the message itself must wrap them.
val spanContext = span.spanContext                                                //1
val message = MqttMessage().observe {

  homes = MqttProperties().observe {
    val traceparent = "00-${spanContext.traceId}-${spanContext.spanId}-${spanContext.traceFlags}" //2
    userProperties = listOf(UserProperty("traceparent", traceparent))             //3
  }
  qos = choices.qos
  isRetained = choices.retained

  val hostAddress = req.remoteAddress().map { it.cope with.hostAddress }.getOrNull()
  payload = Json.encodeToString(Payload(req.trail(), hostAddress)).toByteArray()   //4
}
val shopper = MqttClient(mqtt.serverUri, mqtt.clientId)                            //5
shopper.submit(mqtt.choices, message) //6- Get the span context
- Assemble the
traceparentfrom the span context, consistent with the W3C Hint Context specification - Set the message metadata
- Set the message frame
- Create the buyer
- Post the message
Getting OpenTelemetry Information From the Message
The subscriber is a brand new element in response to NodeJS.
First, we configure the app to make use of the OpenTelemetry hint exporter:
const sdk = new NodeSDK({
  useful resource: new Useful resource({[SemanticResourceAttributes.SERVICE_NAME]: 'analytics'}),
  traceExporter: new OTLPTraceExporter({
    url: `${collectorUri}/v1/strains`
  })
})

sdk.get started()
The next move is to learn the metadata, recreate the context from the traceparent, and create a span.
shopper.on('message', (aTopic, payload, packet) => {
  if (aTopic === subject) {

    console.log('Won new message')

    const knowledge = JSON.parse(payload.toString())

    const userProperties = {}
    if (packet.homes['userProperties']) {                                  //1
      const props = packet.homes['userProperties']
      for (const key of Object.keys(props)) {
        userProperties[key] = props[key]
      }
    }

    const activeContext = propagation.extract(context.energetic(), userProperties) //2
    const tracer = hint.getTracer('analytics')
    const span = tracer.startSpan(                                              //3
      'Learn message',
      {attributes: {trail: knowledge['path'], clientIp: knowledge['clientIp']}},
      activeContext,
    )
    span.finish()                                                                  //4
  }
})- Learn the metadata
- Recreate the context from the
traceparent - Create the span
- Finish the span
For the file, I attempted emigrate to TypeScript, but if I did, I did not obtain the message. Lend a hand or hints are very welcome!
Apache APISIX for Messaging
Regardless that it is not not unusual wisdom, Apache APISIX can proxy HTTP calls in addition to UDP and TCP messages. It simplest gives a couple of plugins this present day, however it is going to upload extra at some point. An OpenTelemetry one will unquestionably be a part of it. Within the period in-between, let’s get ready for it.
Step one is to configure Apache APISIX to permit each HTTP and TCP:
apisix:
  proxy_mode: http&flow                                                       #1
  stream_proxy:
    tcp:
      - addr: 9100                                                              #2
tls: false- Configure APISIX for each modes
- Set the TCP port
The next move is to configure TCP routing:
upstreams:
  - identity: 4
    nodes:
      "mosquitto:1883": 1                                                       #1


stream_routes:                                                                  #2
  - identity: 1
    upstream_id: 4
    plugins:
      mqtt-proxy:                                                               #3
        protocol_name: MQTT
protocol_level: 5 #4- Outline the MQTT queue because the upstream
- Outline the “streaming” direction. APISIX defines the whole lot that is not HTTP as streaming
- Use the MQTT proxy. Be aware APISIX gives a Kafka-based one
- Deal with the MQTT model. For model above 3, it must be 5
In any case, we will exchange the MQTT URLs within the Docker Compose record with APISIX URLs.
Conclusion
I have described a number of pieces I added to toughen my OpenTelemetry demo on this publish. Whilst maximum are certainly associated with OpenTelemetry, a few of them are not. I would possibly upload every other element in every other other stack, a front-end.
Your complete supply code for this publish may also be discovered on GitHub.